Website Orders To Northern Ireland Now Available!


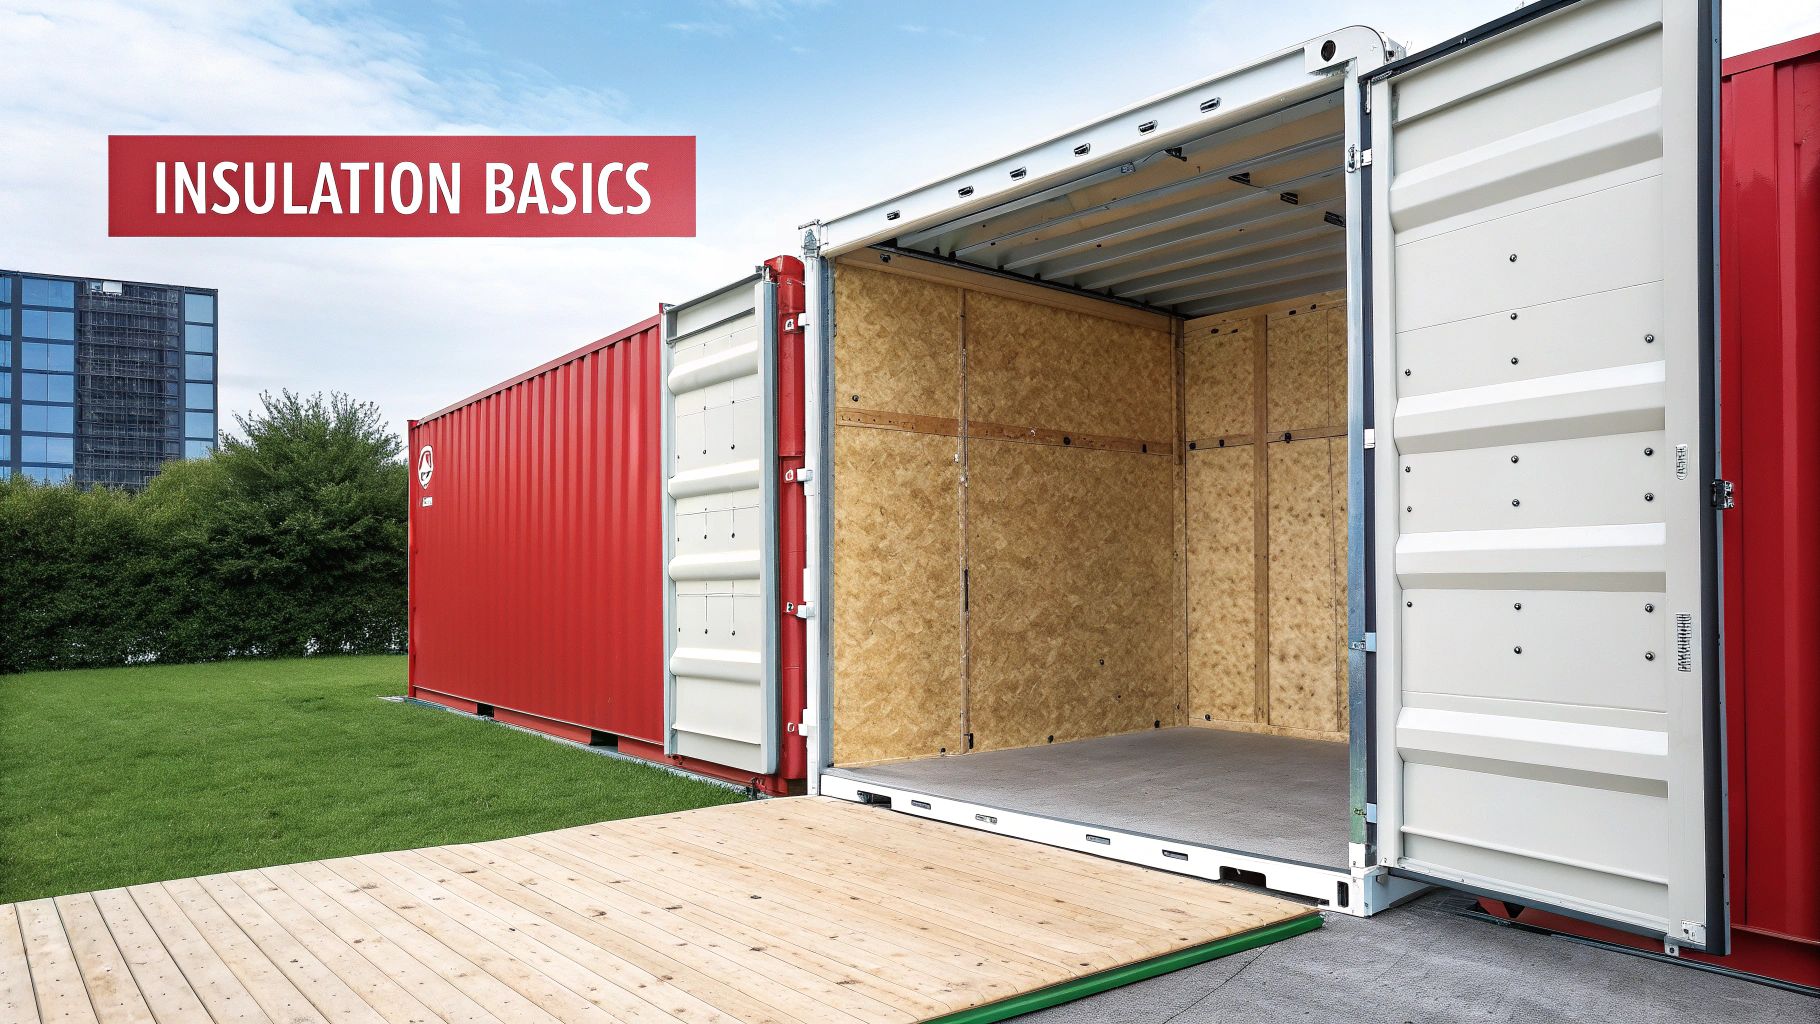
Insulating Shipping Containers: Easy Tips & Cost Guide
Insulating a shipping container isn't just a good idea; it's the most important step you'll take in any conversion project. Think of an uninsulated steel box as a metal tent. It becomes an oven in the summer and a freezer in the winter, making it completely unusable without a proper thermal barrier. Getting the insulation right is fundamental to creating a space that's comfortable, energy-efficient, and built to last.
Why Insulating a Shipping Container Is Non-Negotiable
Before you can turn a raw shipping container into a liveable or workable space, you have to tackle its biggest weakness: the steel itself. Steel is a fantastic conductor of heat, which is the exact opposite of what you want for a comfortable room. This single property makes insulation an absolute must.
Without a thermal break, the thin, corrugated steel walls offer virtually no resistance to the outside temperature. On a sunny day, the metal soaks up the sun's rays, rapidly baking the interior. On a cold UK night, any heat you generate inside escapes just as quickly, leaving the space completely frigid.
The Problem of Thermal Bridging
The steel frame and panels of a container create a huge problem called thermal bridging. The best way to picture this is to think of the metal structure as a superhighway for heat. Any point where the inside connects to the outside without an insulating layer becomes a "bridge" for thermal energy to zip across.
This means heat rushes out in the winter and floods in during the summer with alarming efficiency. A good insulation strategy has to create a continuous, unbroken blanket to shut down this thermal highway for good.
The Threat of Container Rain
Maybe the most damaging result of poor (or no) insulation is condensation, which is often grimly referred to as 'container rain'. It happens when the warm, moist air inside your container hits the cold surface of the steel walls. The air cools down so fast that it can no longer hold onto its moisture, which then forms water droplets all over the interior surfaces.
This isn't just a bit of damp. Persistent condensation creates the perfect breeding ground for mould and mildew, which can cause serious health issues and ruin whatever you have inside.
Left unchecked, this constant moisture will lead to much bigger problems:
- Rust and Corrosion: The steel itself will start to rust from the inside out, which will eventually compromise the container's structural integrity.
- Mould and Mildew: Spores will grow on walls, ceilings, and any organic material you have inside, wrecking your air quality.
- Damaged Belongings: Everything from furniture and electronics to important documents can be completely ruined by damp and mould.
Whether you're planning a simple garden office or a fully-equipped expandable container home, getting the insulation right is the key to comfort and longevity. It’s not just about staying warm or cool; it’s about protecting your investment and making sure the space stays safe, dry, and usable for years to come.
Choosing the Right Insulation Material for Your Container
Picking the right insulation is probably the single biggest decision you'll make when converting a shipping container. It’s a bit like choosing an engine for a car—the material you go with will dictate the performance, comfort, and even the long-term running costs of your space. The trick is to find that sweet spot between thermal performance, moisture resistance, ease of installation, and, of course, your budget.
The sheer number of options can feel a bit much at first, but they mostly fall into a few key categories. Each has its own pros and cons, especially when you're dealing with the unpredictable UK climate. Let's break down the most common choices to help you find the perfect match for your project, whether it's a simple workshop or a full-blown container home.
Understanding R-Value and Thermal Performance
Before we get into the materials themselves, we need to talk about R-value. Simply put, R-value measures how well a material stops heat from passing through it. The higher the R-value, the better it insulates. For a big steel box that gets scorching hot in the summer and freezing cold in the winter, a high R-value is your best line of defence.
This chart gives you a quick visual comparison of the typical R-value you get per inch from three popular insulation types. It really highlights how much performance can vary.
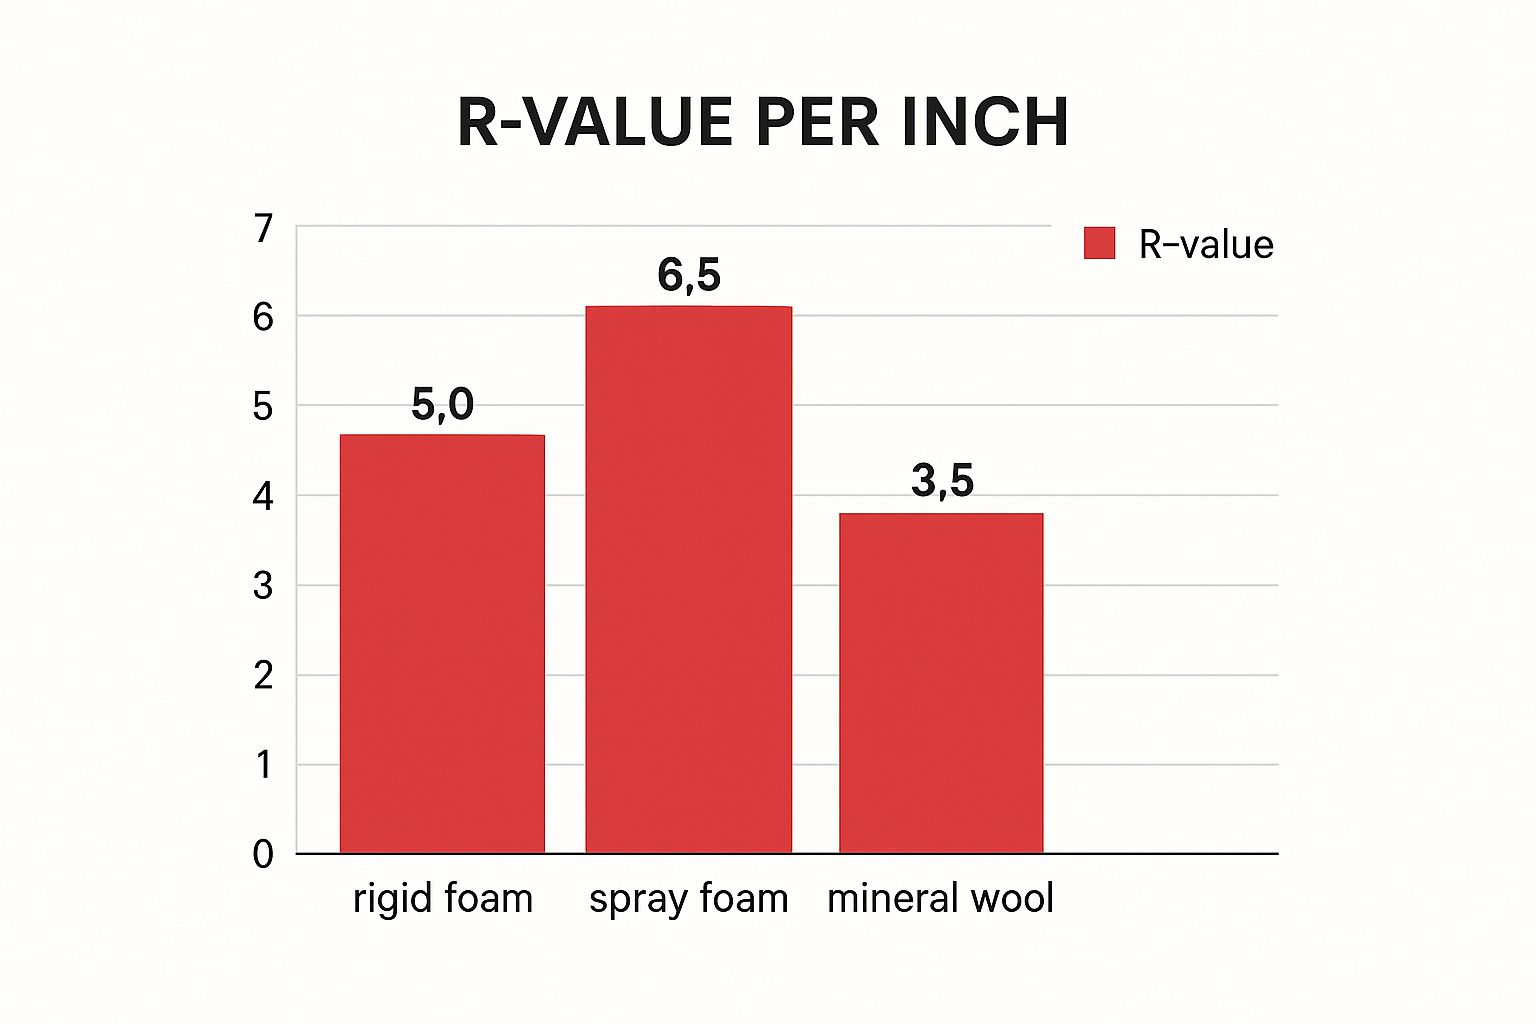
As you can see, spray foam packs the biggest punch for its thickness, which is a massive advantage when you're trying to save every last inch of interior space.
To give you a better idea of what to expect from each material, here's a quick comparison of the most common options available. This should help you weigh up the performance, cost, and installation effort involved.
Comparison of Common Insulation Materials
| Insulation Type | Average R-Value per Inch | Moisture Resistance | Ease of Installation | Estimated Cost (per sq. m) |
|---|---|---|---|---|
| Spray Foam | 6.5 | Excellent | Professional | £35 - £60 |
| Rigid Foam | 5.0 | Good to Excellent | DIY-Friendly | £20 - £40 |
| Mineral Wool | 3.5 | Poor (requires barrier) | DIY-Friendly | £10 - £25 |
This table shows that while spray foam is the top performer, options like rigid foam boards offer a fantastic middle ground for DIY projects, balancing cost and effectiveness.
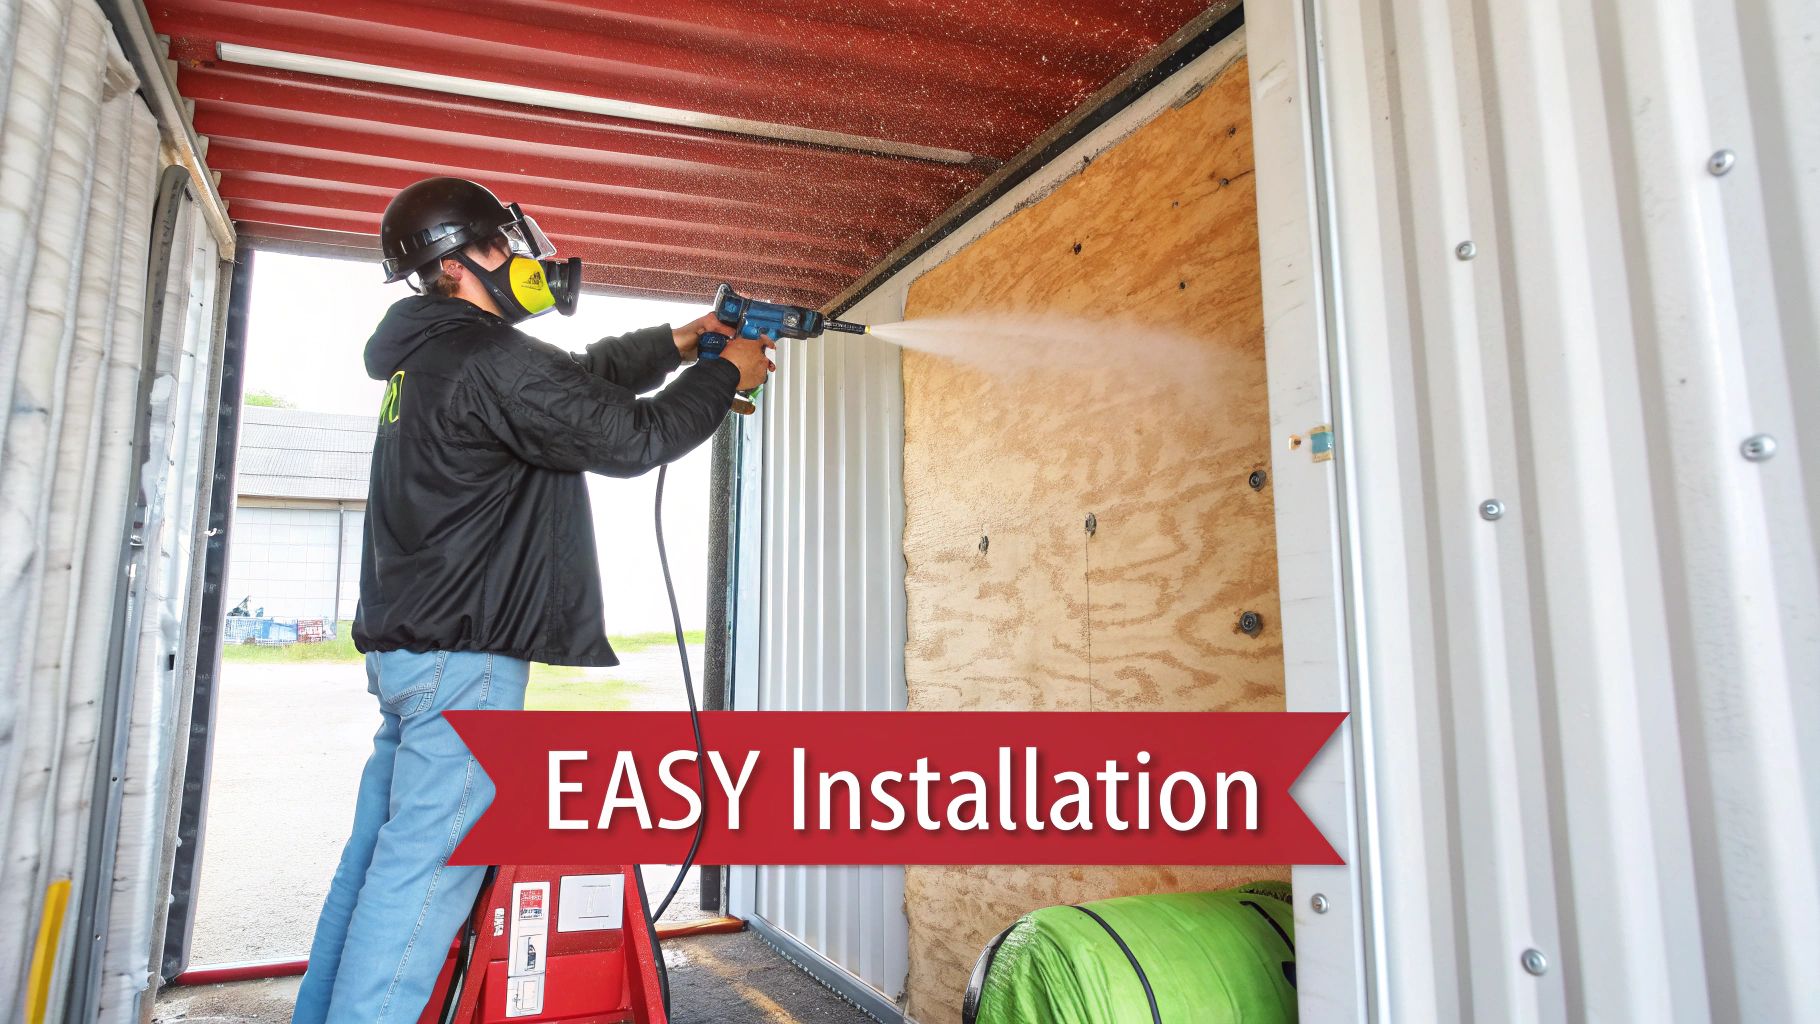
Closed-Cell Spray Foam Insulation
Often hailed as the gold standard, closed-cell spray foam is a game-changer. It’s applied as a liquid that expands on contact, filling every single gap, crack, and crevice before hardening into a solid, airtight layer.
- Pros: It delivers the highest R-value per inch, doubles up as a vapour barrier to completely block moisture, and even adds a bit of structural strength to the container walls.
- Cons: It's the priciest option by a fair margin and absolutely requires professional installation with specialist gear. The application also releases fumes, so the area needs to be well-ventilated and completely empty.
If performance and stopping condensation are your top priorities, spray foam is the undisputed champion. Its ability to create a single, seamless seal makes it incredibly effective at preventing cold spots and moisture problems.
Rigid Foam Boards (PIR and XPS)
Rigid foam boards, like Polyisocyanurate (PIR) or Extruded Polystyrene (XPS), are an incredibly popular choice for DIY container conversions, and for good reason. They come in large sheets that you simply cut to size and slot in between the timber or metal framing inside your container.
They offer a fantastic balance of performance and practicality. Here in the UK, a lot of modern insulation relies on materials like polyurethane foams, which are the same type used in refrigerated lorries. For context, just 2.5 cm of polyurethane foam can make a huge difference in heat transfer, and doubling that to 5 cm can boost its effectiveness by about 40%.
- Pros: Great R-value, good moisture resistance (XPS is particularly good), and straightforward enough for a competent DIYer to install.
- Cons: You have to be meticulous about taping the seams between the boards. Any gaps will create cold spots (thermal bridges) and let air through, undermining your hard work. It's also less forgiving on the corrugated container walls than spray foam.
Mineral Wool and Sustainable Alternatives
Mineral wool, which you might know as rock wool, is made from spun volcanic rock and is famous for being highly fire-resistant. It usually comes in big rolls or semi-rigid slabs (batts) that you friction-fit into your stud frame.
It's a solid, reliable choice if you're on a tighter budget, though it does need to be handled carefully. For those looking for a greener approach, sheep's wool offers similar thermal properties. It's naturally breathable and fantastic at managing moisture, but it does tend to cost a bit more. If you'd like to explore this further, we have a complete overview of insulation options for shipping containers.
- Pros: Very cost-effective, non-combustible (a big safety plus), and provides excellent sound dampening.
- Cons: It has a lower R-value per inch than foam, so you'll need a much thicker layer to get the same performance. It can also act like a sponge and absorb moisture if your vapour barrier fails, which kills its insulating ability.
Ultimately, the best material really boils down to your specific project. If you have the budget and want the absolute best performance, go for professionally installed spray foam. For a top-quality DIY job, rigid foam boards are a superb all-rounder. And if budget or fire safety is your number one concern, mineral wool is a dependable workhorse that won't let you down.
Your Step-by-Step Container Insulation Guide
Alright, you’ve picked your insulation material—now for the hands-on part. Insulating a shipping container is a methodical job where the prep work is just as important as slapping the boards on the wall. Think of it less as a sprint and more as a careful assembly process.
This guide walks you through the essential steps, from getting that steel shell ready to creating a perfectly sealed interior. Following a clear process is the best way to avoid common pitfalls and ensure you end up with a durable, effective thermal barrier. Whether you're a seasoned DIYer or hiring a contractor, knowing what goes into each stage is crucial for success.
Phase 1: Prepping Your Container For Insulation
Before a single piece of insulation goes in, you have to get the container’s surface ready. This isn’t a step you can afford to skip. Trapping moisture or rust behind your new walls is a recipe for disaster down the line. You need a clean, sound, and completely dry surface to build on.
Your first job is to give the entire interior a thorough inspection. Get in there and look for any rust patches, dents, or tiny pinhole leaks where water could sneak in.
Key Preparation Tasks:
- Clean and Degrease: Give the interior walls and ceiling a good wash with a strong degreasing agent. This gets rid of any industrial grime or contaminants left over from its life at sea.
- Treat Rust: Get a wire brush or an angle grinder and remove every bit of surface rust. Treat those spots with a rust converter to neutralise it and stop it from ever coming back.
- Seal Leaks: Check every seam, corner, and weld with a fine-tooth comb. If you find any potential leaks, seal them up with a high-quality, marine-grade sealant to make the container completely watertight.
- Apply Primer: Once it’s clean and bone-dry, roll on a coat of rust-inhibiting, direct-to-metal primer. This adds a protective barrier and gives your insulation adhesive something solid to grip onto.
Before you dive into the project, it's vital to carry out a proper hazard identification to keep your work environment safe. You'll be dealing with grinders, chemicals, and working in a confined space, so don't skip the safety precautions.
Phase 2: Building The Internal Frame
With the container prepped and primed, the next step is building an internal frame. This is usually done with timber or metal studs. The frame does two jobs: it creates a cavity for your insulation to sit in, and it gives you something to attach your interior walls to, like plywood or plasterboard.
This frame doesn’t need to be as beefy as one in a traditional house, but it does need to be square and securely fastened. The corrugated container walls aren’t exactly flat, so the frame is what allows you to create a smooth, even surface for your final finish.
Framing Considerations:
- Timber vs Metal: Timber studs are cheap and easy for most DIYers to work with. Metal studs are lighter, perfectly straight, and won’t ever rot or attract pests, but they can be a bit more fiddly to install.
- Frame Depth: The depth of your frame should match the thickness of your insulation. Simple as that. If you're using 100mm rigid foam boards, you need 100mm deep studs.
- Fixing to the Container: You can screw the frame directly to the container walls with self-tapping screws or use a strong construction adhesive. Another option is to build a "floating" frame that stands independently inside the container without being fixed to the walls.
Phase 3: Fitting The Insulation and Vapour Barrier
This is where the magic happens and your thermal envelope comes to life. The exact method will change a little depending on your material, but the goal is always the same: create a continuous, unbroken layer of insulation with absolutely no gaps.
If you’re using rigid foam boards, cut each panel to fit snugly between the studs—a tight "press-fit" is what you’re aiming for. Use a quality adhesive foam to secure the boards to the container wall and to fill any tiny gaps around the edges. Sealing every little crack is crucial for stopping thermal bridging.
Once the boards are in, grab some specialist foil tape and seal every single joint and seam between the panels. This turns all those individual boards into one massive, continuous, and airtight layer.
Finally, you need to install a vapour control layer (VCL) on the "warm" side of the insulation (that's the interior side). This is a plastic membrane you staple over the studs and insulation. It’s designed to stop warm, moist air from inside your container from hitting the cold steel wall and creating condensation. Overlap the seams by at least 150mm and tape them securely. Managing this moisture is a huge part of the job, and exploring ventilation and condensation solutions can help protect your project even further.
On the other hand, if you've opted for spray foam, this stage is a job for the pros. They'll come in and spray the foam directly onto the primed interior walls. It expands instantly, filling every nook and cranny between the corrugations and creating a perfect, seamless seal that acts as both insulation and a vapour barrier all in one go.
How to Defeat Condensation in Your Container
Condensation is the silent saboteur of any shipping container project. It’s a stealthy enemy that causes rust, mould, and irreversible damage before you even realise it’s there. Winning the battle against moisture isn't just about damage control; it's about creating a healthy, durable, and comfortable space from the very beginning.
The phenomenon, often called ‘container rain’, is just simple physics at play. When the warm, humid air inside your container—whether from breathing, cooking, or even just boiling a kettle—collides with the cold steel walls, it cools down fast. This sudden temperature drop forces the air to release its moisture, forming droplets that trickle down the walls and ceiling. Think of it like a cold pint glass on a summer day.
The Role of Continuous Insulation
The best way to defeat condensation is to be proactive, not reactive. Your first and most powerful line of defence is a continuous, unbroken layer of insulation. It's like putting a warm coat on the inside of the container.
By completely separating the warm indoor air from the cold steel shell, you eliminate the temperature shock that causes condensation. The surface your indoor air now touches is the warm side of the insulation, not the freezing metal. This is why methods like closed-cell spray foam are so effective—they create a single, seamless barrier with no gaps for moisture to sneak in and form.
Internal vs External Insulation for Moisture Control
One of the big decisions you'll make is whether to insulate inside or outside the container. While popping insulation on the inside is more common for DIY projects, wrapping the outside is technically the superior approach for moisture management.
- Internal Insulation: This is generally easier to install and keeps the insulation itself protected from the elements. The downside is that it doesn't stop the steel frame itself from getting cold, which can create 'thermal bridges'—cold spots—if it's not perfectly sealed.
- External Insulation: This method involves wrapping the entire container, keeping the steel structure on the 'warm' side of the insulation. It completely eliminates thermal bridging and condensation risk, but it's a more complex and costly job because it needs external cladding for weather protection.
In the damp UK climate, a perfectly installed vapour barrier is non-negotiable. This special membrane is fitted on the warm side of the insulation and acts as a final gatekeeper, stopping any water vapour from ever reaching the cold steel.
The Importance of Active Ventilation
Even with flawless insulation, you still need to get rid of the moisture created by everyday living. That’s where active ventilation comes in. A static, sealed box will always be a magnet for damp and poor air quality.
Installing simple passive vents or an active extractor fan creates essential airflow. It works by pulling the moist, stale air out of the container and replacing it with fresh, drier air from outside. This constant air exchange ensures humidity levels never get high enough to cause problems. You can learn more about how to reduce condensation in shipping containers in our detailed guide.
When you combine a complete insulation system with a robust vapour barrier and active ventilation, you create a powerful, multi-layered defence. This three-pronged strategy is the most reliable way to keep your container dry, healthy, and free from the damaging effects of condensation for years to come.
Calculating the Cost of Your Insulation Project

Let's talk numbers. Creating a realistic budget is the bedrock of any successful container conversion, and insulation is a huge piece of that puzzle. Before you get started, it's vital to have a clear, transparent breakdown of all the potential expenses involved in insulating shipping containers.
The final bill isn't just for the insulation panels or foam. It’s a mix of materials, labour, and all those small but essential extras that can sneak up on you. Nailing down the full financial picture from the start helps you make smart decisions, avoid nasty surprises, and keep your project from going off the rails. It’s all about balancing that initial investment with long-term value.
Breakdown of Material Costs
Naturally, the insulation itself will make up the bulk of your budget. Here in the UK, prices can swing wildly depending on the type of material and its performance. The easiest way to compare is to think in terms of pounds per square metre (£/m²).
Here’s a rough guide to what you can expect to pay:
- Mineral Wool: This is your most budget-friendly route, typically running from £10 to £25 per square metre. It’s a solid choice for basic projects where keeping costs down is the top priority.
- Rigid Foam Boards (PIR/XPS): Sitting comfortably in the middle, these boards offer fantastic performance for their price. You're looking at somewhere between £20 and £40 per square metre.
- Closed-Cell Spray Foam: This is the premium option, and for good reason—it delivers unbeatable performance. Expect to pay £35 to £60 per square metre, a price that usually includes professional installation.
But it doesn't stop there. You absolutely have to factor in the "hidden" costs of essential sundries. These are the supporting acts that make the whole system work.
Don't overlook the smaller items in your budget. The cost of timber for framing, vapour barriers, high-quality adhesive tapes, screws, and sealants can collectively add a significant amount to your total material spend.
DIY vs Professional Installation Costs
Your next big decision is whether to roll up your sleeves and install it yourself or bring in the professionals. This choice will have a major impact on both the upfront cost and the final quality of the job.
Going full DIY is obviously the most cost-effective path, as you're only paying for the materials. This approach is a great fit for materials like mineral wool and rigid foam boards, as long as you have the time, patience, and skills to do the job properly.
On the other hand, some materials just aren't DIY-friendly. Closed-cell spray foam, for example, demands specialist equipment and a lot of expertise to apply correctly. While hiring a pro adds labour costs to the bill, it guarantees a flawless application. That perfect, airtight seal is what makes spray foam so effective, so the investment often pays for itself in superior performance and peace of mind.
Cost insights in the UK suggest container homes can offer construction savings of 25% to 40% over traditional builds. However, retrofitting challenges like high-quality insulation can push costs up. In the UK's climate, getting the insulation right is non-negotiable for comfort and long-term energy savings. You can find more information about UK container home building costs on adaptainer.co.uk.
Common Insulation Blunders and How to Sidestep Them
Learning from other people's mistakes can save you a world of time, money, and headaches when it comes to insulating a shipping container. Even a tiny oversight can torpedo the whole project, leaving you with damp, cold spots, and terrible energy efficiency. You really want to get this right the first time to create a space that’s comfortable for the long haul.
One of the most common slip-ups is failing to create a completely sealed, continuous layer of insulation. This mistake creates what's known as thermal bridging, where heat finds a sneaky escape route straight through the container's steel frame. These little cold spots act like magnets for condensation, quickly turning into problem areas for damp and mould.
Another classic pitfall is sloppy surface prep. Rushing to slap up insulation without properly cleaning and priming the container’s steel interior is a recipe for disaster. All you’re doing is sealing in existing rust and moisture, letting corrosion chew away at the steel, hidden behind your brand-new walls.
Overlooking Vapour Barriers
A huge and costly mistake is installing a vapour barrier incorrectly—or worse, forgetting it altogether. In the UK's damp climate, this is absolutely non-negotiable. A vapour barrier’s one job is to stop warm, moist air from inside your container from ever touching the cold steel surface.
If you put it on the wrong side of the insulation (it always goes on the warm, interior side) or leave the joints unsealed, you end up trapping moisture inside the wall cavity. This creates a perfect, humid terrarium for mould to grow and for your insulation to get soaked, rendering it completely useless.
The best insulation strategy is a holistic one. Think of it as creating a completely sealed envelope. Every single part—the primer, the insulation, the taped seams, and the vapour barrier—has to work together. One weak link can bring the whole system down.
Choosing the Wrong Material or Thickness
Finally, picking the wrong type of insulation or simply not using enough of it can completely undermine all your hard work. For instance, choosing a material with poor moisture resistance, like mineral wool, without a flawless vapour barrier is just asking for trouble. In the same way, opting for a thin layer of insulation to save a few inches of interior space will hit you with poor thermal performance and higher energy bills down the line.
The UK government's focus on energy efficiency really drives this point home. Between 2013 and 2024, a staggering 4.5 million energy efficiency measures were installed in 2.8 million properties across the country. In 2024 alone, over 420,600 insulation measures were put in place, showing just how widely understood it is that doing the job properly maximises energy savings. You can dive deeper into these UK energy efficiency trends on gov.uk.
Frequently Asked Questions About Container Insulation
When you get down to the nitty-gritty of insulating a shipping container, a lot of questions tend to pop up. To help you plan your project with a bit more confidence, we’ve put together some straight answers to the queries we hear most often from container converters around the UK.
Do I Need to Insulate the Floor and Ceiling?
Yes, without a doubt. Think of it like trying to stay warm in a sleeping bag with a massive zip undone – it just doesn’t work. To create a proper thermal envelope, you have to insulate all six sides of the container: the four walls, the floor, and the ceiling.
If you skip a surface, you create what's called a thermal bridge, which is just a fancy way of saying you've left a huge gap for heat to pour in or out. The floor is notorious for sucking warmth out and pulling cold up from the ground, while the ceiling is your first line of defence against losing heat in winter and baking under the summer sun. Cutting corners here will seriously undermine all your hard work and almost guarantee you'll have problems with comfort and condensation down the line.
Is It Better to Insulate a Container Internally or Externally?
Both approaches have their own pros and cons, especially when you factor in the classic British weather.
-
Internal Insulation: This is the go-to method for most DIY projects and for good reason. It’s generally simpler to install and keeps your expensive insulation materials protected from the elements. The big trade-off? You sacrifice valuable interior space.
-
External Insulation: From a pure performance standpoint, this is the superior option. By wrapping the entire steel structure from the outside, you completely eliminate thermal bridging. However, it's a much bigger job that involves adding a protective outer cladding, making it more complex, labour-intensive, and costly.
What Is the Best Insulation for a Container Home?
For a container home here in the UK, closed-cell spray foam is pretty much the gold standard. It delivers the highest R-value for its thickness, creates a perfect airtight seal, and even acts as its own vapour barrier. This triple-threat performance makes it incredibly effective at stopping both heat transfer and condensation in its tracks.
While spray foam is the top dog in performance, it’s also the priciest option and needs to be installed by a professional. If you're looking for an excellent balance of performance, cost, and DIY-friendliness, high-quality rigid foam boards like PIR are a hugely popular and effective alternative. Just be absolutely meticulous about taping up every single joint.
Getting your insulation strategy right is the foundation of any successful container conversion. By thinking through these key questions, you can make smarter decisions that will keep your space comfortable, dry, and energy-efficient for many years to come.
Ready to start your container conversion? Quickfit Container Accessories has all the high-quality parts and fittings you need, from ventilation solutions to secure fixtures. https://www.quickfitcontaineraccessories.co.uk