Website Orders To Northern Ireland Now Available!


A UK Guide to Insulation for Shipping Containers
Proper insulation is the single most important decision you'll make when converting a shipping container into a usable space. Without it, that steel box becomes an oven in the summer and a freezer in the winter, making it pretty much useless for storage, work, or living. Think of insulation as the crucial thermal barrier that makes everything else possible.
Why Insulating Your Shipping container Is Non-Negotiable

It’s easy to get excited about the blank canvas a shipping container offers, but its all-steel construction throws up some unique challenges. Steel is a fantastic conductor of heat, which means it absorbs and loses warmth incredibly quickly. This leaves an uninsulated container at the mercy of the weather outside, creating an uncomfortable and often damaging environment inside.
Insulation isn’t just a nice-to-have; it's a fundamental requirement for nearly any container project here in the UK. By adding that thermal barrier, you transform the container from a simple metal shell into a space with a stable, controllable climate. This is absolutely essential whether you’re storing sensitive goods, setting up a workshop, creating an office, or building a home.
Tackling Temperature and Condensation
First and foremost, insulation is all about regulating temperature. In the summer, it stops the sun's heat from baking through the steel walls, keeping the inside cool. In the winter, it keeps the warmth in, meaning you won’t have to run a heater constantly. This thermal control is the key to a comfortable space and lower energy bills.
But temperature is only half the story. The other big enemy is condensation. When warm, damp air inside the container hits those cold steel walls, the moisture turns into water droplets. This is often called 'container rain', and it can cause some serious headaches.
Without proper insulation and ventilation, condensation leads to rust, mould, and mildew. This can damage the container's structure and ruin whatever you have stored inside, creating an unhealthy environment and shortening the life of your investment.
Getting a handle on this risk is paramount. We have a detailed guide on how to reduce condensation in shipping containers that offers more practical steps. Insulation is also a major player in many common strategies to prevent damp and condensation in any enclosed space.
The Rise of Insulated Container Solutions
Demand for properly insulated containers has shot up across the UK, and for good reason. With the self-storage industry turnover hitting around £1.2 billion and a huge number of sites now offering container storage, the need for quality conversions is obvious.
It turns out that around 24% of container users actually run businesses from their units. This really highlights the need to create spaces that are usable all year round, which is exactly what effective insulation delivers. This trend shows a growing awareness of the benefits—from energy efficiency to sheer comfort—that a well-insulated container brings to the table.
Comparing the Best Insulation Materials for Containers
Picking the right insulation for a shipping container is a massive decision. Get it right, and your space will be comfortable, efficient, and dry for years to come. Get it wrong, and you could be dealing with condensation, high energy bills, and a space that’s just plain unpleasant.
You’ve really got three main players in the container insulation game: closed-cell spray foam, rigid foam boards, and traditional blanket insulation like mineral wool. Each one strikes a different balance between performance, cost, and how much of a headache it is to install. Let’s break them down.
Closed-Cell Spray Foam: The High-Performance Choice
If you're looking for the best of the best, closed-cell spray foam is it. Often seen as the gold standard for container projects, it’s a liquid polyurethane applied by professionals. They spray it directly onto the container’s interior, where it expands to fill every single nook, cranny, and corrugation. The result is a perfect, seamless, airtight seal.
Its biggest selling point is that it does three jobs at once. Because it sticks directly to the steel and its cell structure is impermeable to moisture, it acts as your insulation, air barrier, and vapour barrier all in one. That means no need for extra membranes, which simplifies the build and offers unbeatable protection against condensation. It even adds a bit of structural rigidity to the container walls.
Of course, all that performance comes with a price tag. Spray foam is usually the most expensive option and definitely not a DIY job. It involves specialist equipment and chemicals, so you have to bring in the pros. But for projects where you simply can’t compromise on thermal efficiency and moisture control, it’s an investment that pays off.
Rigid Foam Boards: The Versatile DIY Option
Rigid foam boards, like Polyisocyanurate (PIR) or Extruded Polystyrene (XPS), are a fantastic middle-ground. They offer great performance, but they’re much more approachable for the DIYer. These boards are lightweight, easy to cut with basic tools, and provide a solid R-value without eating up too much of your precious interior space.
The installation process is a bit more involved than just spraying and walking away.
- Framing: First, you’ll need to build a timber or steel stud frame inside the container. This frame gives you something to fix the boards to.
- Fitting: Next, you cut the foam boards to fit snugly between the studs, right up against the container's corrugated steel walls.
- Sealing: This is the most critical part. Every single seam between the boards and any gaps around the framing must be sealed. You can use specialist foil tape or a small amount of expanding foam to create an airtight finish and prevent thermal bridging.
A classic mistake with rigid boards is skimping on the sealing. Even tiny gaps can let warm, moist air sneak through to the cold steel wall, leading to condensation that completely undermines all your hard work.
While it’s more labour-intensive than calling in a spray foam team, this method gives you fantastic results on a more manageable budget. You get full control over the process.
Blanket Insulation: The Traditional Approach
Then you have blanket insulation, like mineral wool (often called rock wool) or fibreglass. This is the stuff you’re used to seeing in traditional home construction, and it comes in big rolls or "batts." It’s generally the most budget-friendly choice you’ll find.
Mineral wool is a particularly good fit for container projects. It’s naturally resistant to moisture and it’s non-combustible, which adds a nice layer of fire safety. On top of that, it has excellent sound-dampening qualities—a huge bonus for turning a noisy steel box into a quiet, comfortable space.
Installation is similar to rigid foam: you build an interior frame and friction-fit the batts between the studs. The big difference? Blanket insulation absolutely must be paired with a separate, perfectly installed vapour barrier on the "warm" side (the interior-facing side). This stops moisture from travelling through the insulation and condensing on the cold steel. It also has a lower R-value per inch, so you might need to build thicker walls to get the same level of thermal performance you’d get from foam.
To help you weigh up the options, here's a quick side-by-side look at the most common materials used for insulating shipping containers in the UK.
Insulation Material Comparison for UK Container Projects
| Insulation Type | Typical R-Value (per inch) | Average Cost (per m²) | Pros | Cons |
|---|---|---|---|---|
| Closed-Cell Spray Foam | R-6.5 to R-7 | £25 - £45 | Highest R-value; seamless air & vapour barrier; adds rigidity. | Most expensive; requires professional installation. |
| Rigid Foam (PIR/XPS) | R-5 to R-6.5 | £15 - £30 | Good R-value; DIY-friendly; lightweight. | Seams must be meticulously sealed; requires framing. |
| Mineral Wool | R-3.5 to R-4 | £8 - £18 | Budget-friendly; fire-resistant; excellent sound dampening. | Lower R-value; requires separate vapour barrier; bulkier. |
This table should give you a solid starting point. Remember to balance the upfront cost against long-term performance and the specific demands of your project.
This chart provides a quick visual comparison of the thermal performance, or R-value, for some common insulation types.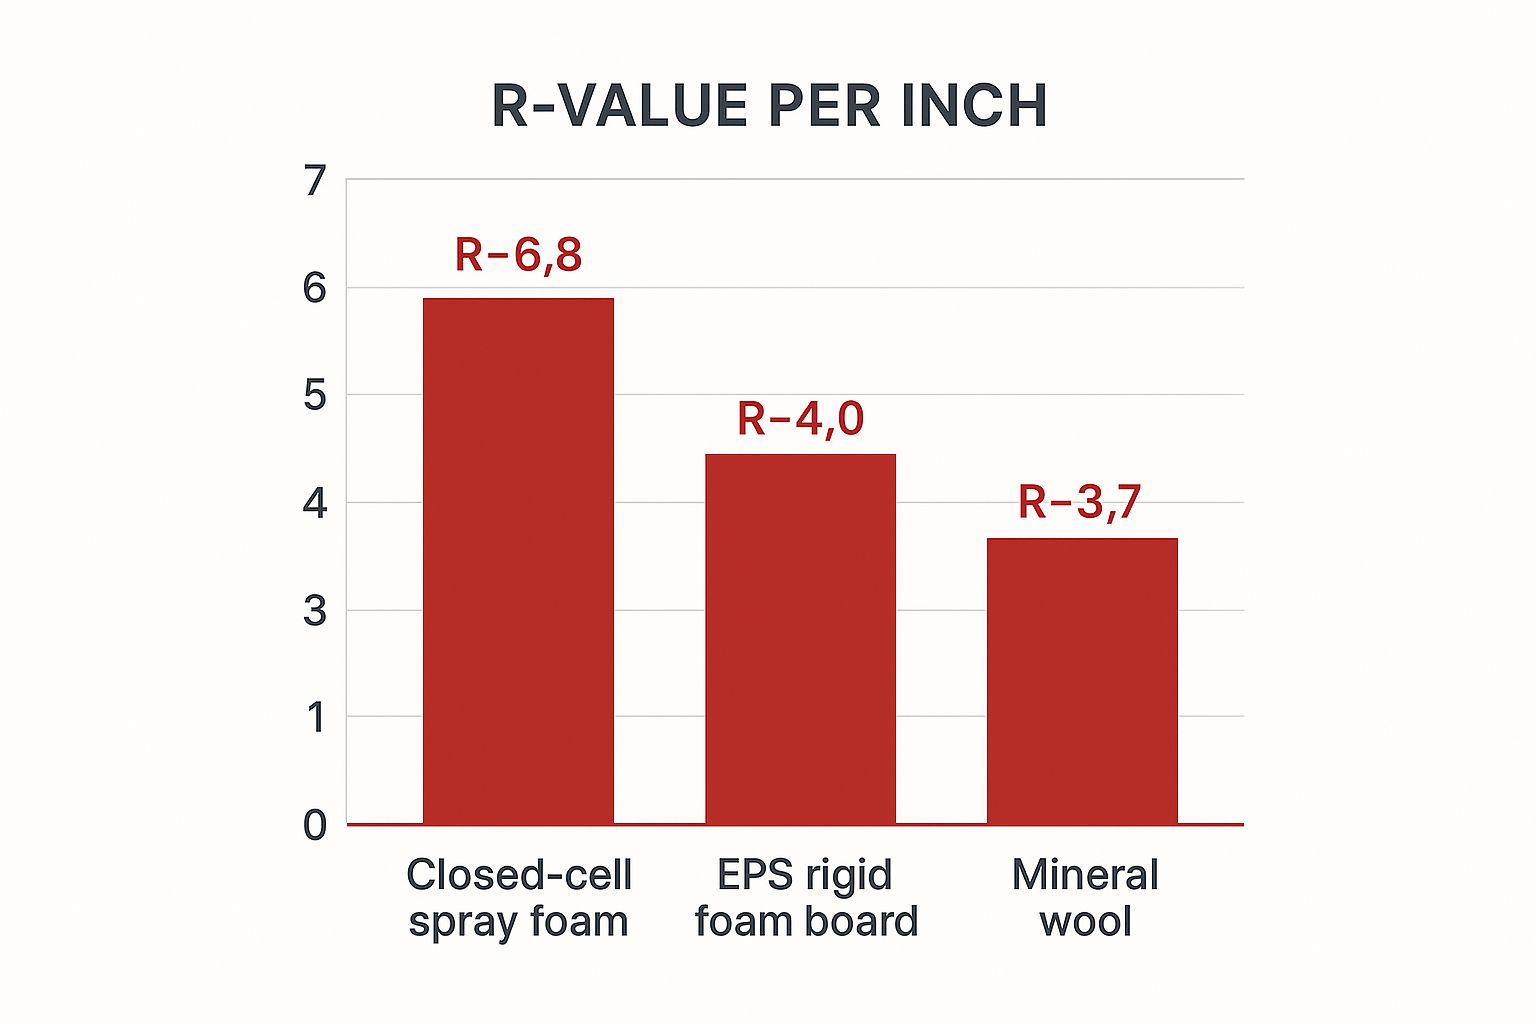
The data clearly shows that closed-cell spray foam offers the highest R-value per inch, making it the most efficient insulator in terms of space.
A Deeper Look at Spray Foam Insulation
When performance is the only thing that matters for your shipping container project, spray foam insulation is almost always the answer. It’s often called the gold standard—especially the closed-cell version—and for good reason. Unlike rigid boards or blankets that you have to cut and squeeze into place, spray foam is a completely different beast.
The real magic is in how it’s applied. It starts as a liquid that expands in a flash the moment it hits the container’s interior walls. As it grows, it pushes its way into every single nook, cranny, and corrugation, creating one seamless, solid layer that’s bonded directly to the steel. The result is an airtight seal that’s pretty much impossible to achieve with any other material.
That airtightness is a game-changer for shipping containers. Not only does it stop heat transfer in its tracks, but it’s also your best defence against condensation. Because there are zero gaps for warm, moist air to sneak through and hit the cold steel, the dreaded ‘container rain’ is all but eliminated.
Why Closed-Cell Foam Is the Superior Choice
While you might hear about different kinds of spray foam, closed-cell spray foam is the only one you should seriously consider for a steel container. Its structure is made of tiny, self-contained cells filled with gas, all packed tightly together. This dense, rigid structure is what gives it such impressive insulating power and strength.
The killer feature of a closed-cell structure is its resistance to moisture. It simply doesn’t absorb water and acts as its own vapour barrier, meaning you can skip installing a separate membrane. This three-in-one superpower—insulation, air barrier, and vapour control—makes the whole build simpler and delivers a far more durable result.
This is a world away from open-cell spray foam, which has a soft, sponge-like texture. While open-cell foam is a decent insulator, it can soak up water like a sponge, which would be an absolute disaster when sprayed directly onto a steel surface that’s prone to rust.
The Professional Application Process Explained
Getting these top-tier results isn't a weekend DIY job; it calls for specialist kit and trained professionals. The process is meticulous but incredibly effective, guaranteeing complete coverage and peak performance.
Here’s a rough breakdown of what to expect:
- Surface Preparation: The container’s interior has to be clean, dry, and free from any rust or dirt that could stop the foam from sticking properly.
- Masking and Protection: Technicians will cover up any areas that shouldn't get sprayed, like door seals, vents, or spots where windows will be cut out later.
- Application: Decked out in full protective gear, the installer uses a high-pressure spray gun to apply the liquid foam evenly across the walls and ceiling.
- Expansion and Curing: The foam puffs up to its final thickness in seconds and hardens into a rigid layer over the next few hours.
This professional touch ensures you get a perfect, unbroken thermal envelope that’s custom-moulded to your container’s unique shape.
Thickness and UK Building Regulations
The amount of spray foam you’ll need really depends on what you’re trying to achieve. In the UK, it’s a well-regarded method for controlling the climate inside a container. A layer of about 50mm of closed-cell foam is often plenty to stabilise temperatures for uses like site offices, workshops, or storing high-value goods.
However, if you're converting a container into a habitable space that needs to comply with UK Building Regulations, you'll need a much thicker layer to hit the required U-values. Costs can start from around £15 per square metre for a basic anti-condensation coating and climb to over £50 per square metre for a full residential-spec job. While it might seem like a hefty upfront investment, its long-term performance and durability often make it the smartest choice. You can explore more about the associated costs and benefits of spray foam insulation in the UK to get a clearer picture for your project.
How to Choose the Right Insulation for Your Needs
Picking the right insulation for your shipping container is about more than just grabbing the material with the highest R-value. It’s a practical decision, a balancing act between your project’s real-world purpose, your budget, and how you plan to install it. Getting this right means you’ll have a container that performs exactly as you need it to, without overspending on features you don't.
First things first, what are you actually going to do with the container? The needs of a simple storage unit are miles apart from those of a garden office or a full-blown living space. A clear vision for your project will instantly narrow your options and make the whole process a lot simpler.
Matching Insulation to Your Container’s Use
Your container's job dictates everything. There’s no one-size-fits-all solution here; you need to match the insulation to the specific level of climate control your project demands.
- General Storage: If you’re just storing tools, furniture, or other non-sensitive items, your main goal is to stop the worst of the temperature swings and keep condensation at bay. A basic layer of rigid foam board or even a professionally applied anti-condensation spray might be all you need.
- Workshop or Hobby Room: Planning to spend a decent amount of time inside? Comfort becomes a priority. You’ll need something more robust, like well-sealed PIR rigid foam boards, to keep the temperature stable and make the space usable all year round.
- Office or Living Space: For any kind of habitable space, high performance is non-negotiable. This is where investing in professional closed-cell spray foam really pays off. It creates a completely sealed thermal envelope, hitting the higher standards needed for comfort and energy efficiency.
Budget and Installation Considerations
Your budget and whether you're planning a DIY job or calling in the professionals are the next big questions. These two things are often linked—your budget might decide if you can afford a pro, while your confidence in your DIY skills could steer you towards a particular material.
Let’s say you’re building a garden workshop yourself and need solid performance without breaking the bank. Rigid foam boards are a fantastic choice. They are manageable for a hands-on project and offer great value. On the flip side, if you're creating a living space that has to meet strict thermal standards, paying for professional spray foam is the most reliable way to get a flawless, high-performance finish.
It’s smart to look at the total project cost, not just the price of the insulation itself. Blanket insulation might seem cheap off the shelf, but it requires a hefty internal frame and a separate vapour barrier, adding to your labour and material costs. Sometimes, what looks like the pricier option can actually be more cost-effective when all is said and done.
Critical UK Climate Factors
Here in the UK, getting a container ready for year-round use typically means using insulation that’s between 50mm and 100mm thick. This ensures it can handle our damp and chilly climate effectively.
Spray foam, usually costing between £20 and £30 per square metre, is brilliant for creating a perfect seal. However, rigid foam boards offer a more budget-friendly DIY alternative. Just remember, if you go with boards or blankets, a vapour barrier is absolutely essential to prevent rust and moisture damage. Common mistakes, like leaving small gaps or skipping the barrier entirely, can ruin the effectiveness of your insulation, so a quality installation is vital for keeping those long-term energy costs down.
Finally, don’t overlook the small details that make a huge difference. Good seals around doors and vents are critical for stopping draughts and moisture from getting in, which can completely undermine even the best insulation job. Make sure every part of your container is properly protected by checking out our guide on choosing the right seals for containers.
A Step-by-Step DIY Installation Guide

Ready to get your hands dirty? Fitting rigid foam board insulation is a popular and surprisingly manageable DIY project. It does demand a bit of patience and an eye for detail, but the process itself is pretty straightforward.
This guide will walk you through the key steps, so you can tackle the job with confidence.
Step 1: Prepare the Container Surface
First things first: you need to get the container’s interior prepped and ready. Any dirt, grease, or flaky rust will stop your adhesives and tapes from sticking properly, basically undermining the whole project before you’ve even started.
Kick things off with a deep clean. A pressure washer or a stiff brush with a good degreaser will do the trick on the walls and ceiling. Once it’s dry, have a good look for any rust spots. You can scrub off minor surface rust with a wire brush, then hit it with a rust-inhibiting primer to seal the metal and stop it from spreading.
Don't skip this part. A clean, solid surface is the foundation of a good insulation job.
Step 2: Build Your Interior Frame
Rigid foam boards can’t just float in mid-air; they need a structure to sit inside. This frame will also be what you attach your final interior walls to. Most people build an interior stud wall using either timber or steel, though timber is usually the go-to for DIY projects because it’s easier to work with.
You’ll build this frame around the entire inside perimeter of the container. One key thing to watch out for is thermal bridging—this is where heat zips through the studs themselves, creating chilly spots on your finished wall. To cut down on this, try to make the insulation boards behind the studs as continuous as you can.
Remember to plan the frame around any features you're adding. It’s a whole lot easier to build in support for windows, doors, and electrical outlets now than it is to backtrack later. If you’re putting in windows, have a look at our guide on how to install container windows for a detailed walkthrough.
Step 3: Cut and Fit the Insulation Boards
With the frame up, it's time to cut and fit your rigid foam boards. Measure each cavity carefully, then use a sharp utility knife or a hand saw to cut the boards for a really snug fit.
The aim here is to get rid of as many gaps as possible. Every board should press up tightly against the corrugated steel wall and fit snugly between the studs. Don't be tempted to just cram the boards in; a precise, clean cut is far more effective.
Take your time with this stage. A perfectly fitted board is your first line of defence in creating a solid thermal barrier. If you rush it and leave gaps, you’re just creating more work for yourself in the next step.
Step 4: Seal All Gaps and Seams
This might just be the most important step in the whole process. Even with perfectly cut boards, you’ll still have tiny gaps between the panels and around the framing. Think of these gaps as weak spots where air and moisture can sneak through.
To get a complete seal, run a quality foil-backed insulation tape along all the seams between the boards. For any bigger gaps or awkward corners, a can of expanding foam filler is your best friend. Be meticulous—make sure every single joint and edge is completely airtight.
Cutting corners here can make all your previous hard work pretty much useless. A fully sealed insulation layer is absolutely vital for stopping condensation and getting the best thermal performance.
Step 5: Install the Vapour Barrier
A vapour barrier is a thin sheet of polythene that you install on the warm side of the insulation—so, facing the inside of your container. Its job is simple: to stop the warm, moist air from inside the room from ever reaching the cold steel wall, where it would instantly turn into condensation.
Drape the vapour barrier over your insulation and framing, using a staple gun to tack it to the studs. Make sure to overlap any seams by at least 150mm (6 inches) and seal them completely with proper vapour barrier tape. This continuous, sealed membrane is your final line of defence against moisture problems.
Step 6: Finish the Interior Walls
With the insulation and vapour barrier locked in place, you’re on the home stretch. Now you can install your interior walls. Plywood, OSB, and plasterboard are all great choices.
Simply screw your chosen wall material directly onto the timber or steel frame you built earlier. This neatly covers up the entire insulation system, giving you a durable, clean finish that’s ready for a lick of paint or whatever decorating you have in mind. It's this final layer that really transforms the container from an industrial box into a proper, liveable space.
Common Insulation Mistakes to Avoid
A successful container insulation project is about more than just following the right steps; it’s about avoiding the wrong ones. Even with the best materials on the market, a few simple mistakes can completely undermine your hard work, leading to cold spots, condensation, and a whole lot of wasted effort.
Getting it right from the start means knowing what can go wrong. Let’s walk through the most common pitfalls so you can steer clear of them.
Creating Thermal Bridges
One of the easiest mistakes to make is creating thermal bridges. This happens when something that conducts heat well, like a timber or steel stud, cuts straight through your insulation. Heat is lazy—it always takes the path of least resistance. Instead of being blocked by your insulation, it will zip right through those studs.
The result? Cold spots pop up on your interior walls. These areas not only make the space feel chilly but also become magnets for condensation, which can lead to bigger problems down the line. To prevent this, always run a continuous, unbroken layer of insulation behind your framing to cut off that direct path from the inner wall to the outer steel.
Ignoring the Vapour Barrier
In the UK, with our notoriously damp climate, forgetting or messing up the vapour barrier is a massive own goal. The only exception here is if you’re using closed-cell spray foam, which does the job for you. A vapour barrier’s purpose is simple: stop warm, moist air from inside your container from ever touching the cold steel shell.
If that warm air sneaks through gaps in your insulation and hits the chilly steel, condensation is a dead certainty. From there, you're looking at rust, mould, and soggy insulation that's pretty much useless. Always fit a continuous, perfectly sealed vapour barrier on the warm side of your insulation.
Choosing an Inadequate R-Value
It’s always tempting to save a bit of cash by opting for thinner insulation panels or a material with a lower R-value. But trust me, this is a classic false economy. An R-value that’s too low for the UK climate just won’t cut it when winter rolls around.
Your heating will have to work overtime just to keep the space comfortable, sending your energy bills through the roof. Do your homework and find out the recommended R-values for what you’re using the container for—be it a workshop, office, or living space—and invest in a thickness that meets or, even better, exceeds those standards. You'll thank yourself later.
Failing to Seal Air Gaps
The last, and arguably most critical, mistake is not getting a completely airtight seal. Even the highest-spec insulation boards are only as good as their installation. If the seams, joints, and edges aren't meticulously sealed, you might as well have not bothered.
- Go Mad with the Foil Tape: Every single seam between insulation boards needs to be covered with good-quality foil tape. No exceptions.
- Fill Every Last Void: Grab a can of expanding foam filler and use it for any gaps around framing, windows, or vents. Be thorough.
- Hunt for Leaks: Go over your work methodically. Make sure there are absolutely no pathways for air to get through your insulation layer.
Even the tiniest air gaps can cause major heat loss and let moisture in, wrecking the entire system. Taking the time to seal everything perfectly is what separates a decent job from a truly professional one.
Frequently Asked Questions
Got a few lingering questions about insulating your shipping container? You're not alone. Here are some clear, straightforward answers to the queries we hear most often, helping you move forward with your project confidently.
How Much Does It Cost to Insulate a Shipping Container in the UK?
The cost of insulating a shipping container really depends on the materials you choose and the size of your unit. For a standard 20ft container, a DIY job using rigid foam boards will typically set you back somewhere between £600 and £1,200 for the materials alone.
If you opt for a professional closed-cell spray foam application, you're looking at a bigger investment, usually ranging from £1,500 to £2,500 or more. While spray foam costs more upfront, its superior performance and airtight seal often lead to long-term savings on energy bills and help you avoid expensive moisture-related repairs down the line.
Do I Need a Vapour Barrier with Spray Foam Insulation?
Nope, and that’s one of its biggest perks. Closed-cell spray foam is impermeable to moisture, which means it acts as an all-in-one insulation, air barrier, and vapour barrier.
It's a different story for other insulation types like rigid foam boards or blanket insulation. With those, a separate and perfectly sealed vapour barrier is an absolute must. In the damp UK climate, it's the only reliable way to stop condensation from forming on those cold steel walls.
Is It Necessary to Insulate the Floor and Ceiling?
Yes, absolutely. To create a complete and effective thermal envelope, you have to insulate everything—walls, ceiling, and floor—without leaving any gaps.
Heat rises, making the ceiling a massive source of heat loss in the winter. At the same time, an uninsulated floor will feel cold and damp, constantly pulling warmth out of the space. Just insulating the walls leaves huge weak spots that undermine the whole effort, so a continuous layer of insulation is vital for a comfortable and efficient container conversion.
Ready to get started? At Quickfit Container Accessories, we stock all the essential parts you need, from ventilation and seals to shelving and security, to make your container conversion a success. Explore our full range of high-quality accessories today. Find what you need on our website.