Website Orders To Northern Ireland & Republic Of Ireland and USA Now Available!


Shipping Container as Garage UK: Complete Guide
Thinking about swapping out a traditional garage for a shipping container? It's a solid idea. They're practical, tough, and often a much faster solution than building something from scratch. Many people find a shipping container garage is lighter on the wallet and can be up and running in a fraction of the time, making it a brilliant choice for securing a vehicle or carving out a workshop space.
Evaluating the Container Garage Option
Across the UK, turning to shipping containers for garages is becoming more and more common, and for good reason. The big draws are usually speed and cost. A traditional brick-and-mortar garage involves a ton of groundwork, bricklaying, and roofing – a process that can drag on for weeks or even months, racking up some serious labour costs. A container, on the other hand, can be delivered and set down on a prepared foundation in a single day.
But it’s not quite as simple as just dropping a steel box on your drive. A successful project means properly weighing up the pros and cons to make sure it’s right for you. While the initial price tag looks appealing, you've got to budget for delivery, sorting out a foundation, and all the necessary customisations like a proper garage door, ventilation, and insulation.
The Real-World Benefits
The plus points go well beyond just the quick setup. Shipping containers are built from Corten steel, a material designed to survive the brutal marine environment. That makes them incredibly durable and secure against both the lovely British weather and anyone trying to break in. This built-in toughness gives a lot of owners real peace of mind.
Other key advantages include:
- Portability: If you ever move house, your garage can potentially come with you. You can’t exactly do that with a brick garage.
- Customisation Potential: Think of a container as a blank canvas. Adding windows, personnel doors, electrics, and shelving is all relatively straightforward. You can get a better sense of the possibilities by reading up on how to turn shipping containers into smart storage spaces.
- Space Efficiency: With standard widths of 8ft and lengths of 20ft or 40ft, they pack a lot of storage into a neat footprint.
To help you see the differences more clearly, here’s a quick side-by-side comparison.
Container Garage vs Traditional Garage At a Glance
| Factor | Shipping Container Garage | Traditional Brick Garage |
|---|---|---|
| Setup Speed | Very fast (days) | Slow (weeks to months) |
| Cost | Generally lower upfront cost | Higher initial investment |
| Durability | Extremely high (Corten steel) | High, but susceptible to mortar decay |
| Security | Excellent inherent security | Good, but depends on doors/windows |
| Portability | Yes, can be relocated | No, permanent structure |
| Customisation | Highly customisable | Limited once built |
| Planning Permission | Often required | Almost always required |
| Maintenance | Requires rust prevention | Needs repointing, roof checks |
Ultimately, the choice comes down to your priorities—whether you value speed and flexibility or the permanence of a traditional build.
Understanding the Drawbacks and Responsibilities
Now for the other side of the coin: the practical hurdles. The biggest one is often dealing with your local council. You can't just assume it's fine to place a container anywhere without checking first. What's perfectly acceptable in a rural field might be a definite no-no in a suburban street.
A common mistake is thinking planning permission is never needed. While some smaller, temporary structures might slide in under 'permitted development' rights, many councils will view a container garage as a permanent outbuilding. That means you'll need to go through a formal planning application.
You also need to think about ongoing maintenance. Containers are tough, but they aren't completely immune to rust, especially if the paint gets scratched or dented. Regular checks and a quick touch-up with marine-grade paint will stop corrosion in its tracks. You’ll also have to tackle internal condensation, which means getting the ventilation right and often adding insulation to protect your car and tools.
The boom in container storage, with the UK self-storage sector's turnover hitting around £1.2 billion, shows just how valuable they are. But it also highlights the need to look after them properly. You can dig into more stats on this surge in the Self Storage Association UK Annual Report.
Navigating UK Planning and Sourcing Your Container
Before you can even think about turning a steel box into your new garage, there are two massive hurdles to clear: the paperwork and the purchase. Get either of these wrong, and your project could be over before it even starts. First up is the often murky world of UK planning rules. Then, you've got to find the right container from a supplier you can trust, making sure you get a solid, fit-for-purpose unit.

Nailing these initial steps is what sets the stage for a smooth, headache-free conversion. Let's break down exactly what you need to know to get both the legal bits and the logistics sorted from day one.
Understanding UK Planning Permission
The first question that pops into most people's heads is, "Do I need planning permission?" Honestly, the answer isn't always a straightforward yes or no. In some cases, a shipping container as garage might just fall under 'permitted development' rights, which means you can skip the full planning application.
This usually applies if the structure is seen as temporary or "incidental to the enjoyment of the main dwelling house." The catch? The interpretation of 'temporary' can vary wildly from one local council to the next. What one authority waves through, another might flag as a permanent structure that needs full planning consent.
A few things can influence their decision:
- Size and Height: A single 20ft container is far more likely to get the nod than a massive 40ft high-cube unit.
- Location on Property: Tucking it away from a boundary and out of public view definitely helps your case.
- Aesthetics: Councils can get touchy about a big metal box changing the feel of a residential street, especially in conservation areas or Areas of Outstanding Natural Beauty.
The golden rule here is to never, ever assume. Before you spend a single pound on a container, get on the phone with your local planning authority. A quick, informal chat can save you a world of hassle and potential enforcement action down the line.
Sourcing the Right Container
Once you've got the green light on the planning front, it’s time to find your container. You'll generally come across two main types: 'one-trip' and used. Knowing the difference is crucial for making a smart investment in your project.
A 'one-trip' container is pretty much brand new. It's been manufactured, loaded with cargo for a single journey from its origin (usually China), and then sold off upon arrival in the UK. These units are in mint condition—minimal dents, pristine paint, and perfect door seals. They're the premium choice if your budget can stretch to it.
On the other hand, a used container has spent a good few years at sea. These are graded based on their condition, from 'wind and watertight' (WWT) right down to heavily damaged. For a garage conversion, you absolutely want a WWT grade at the very minimum. They're more affordable, but they demand a thorough inspection before you part with your cash.
What to Inspect Before You Buy
Never buy a used container sight unseen. If you can, get down to the supplier's depot and inspect it in person. If that's not practical, insist on recent, high-resolution photos of the exact unit you'll be getting.
Here’s your pre-purchase inspection checklist:
- Check for Deep Rust: A bit of surface rust is normal and easy to sort out. What you're looking for is deep, flaky rust or spots where the steel feels thin—especially along the bottom rails and corner castings. That's a sign of serious corrosion.
- Inspect for Major Dents: A few dings and scrapes are just part of a container's story. But big dents in the roof can lead to water pooling, and significant damage to the side panels can compromise the whole structure.
- Test the Doors: Swing the big cargo doors open and shut a few times. They should move without a massive struggle. Pay close attention to the rubber seals around the doors; any tears or gaps are a big no-no for keeping your garage weatherproof.
Choosing a reputable UK supplier is absolutely paramount. Look for companies with solid reviews, a physical depot you can visit, and clear communication. A good supplier will be upfront about the condition of their stock and help you pick the perfect unit for your garage project, ensuring you start with a solid foundation.
Preparing the Groundwork for a Solid Foundation
Once you've settled on the perfect container, the next critical stage is getting the ground it will call home ready. A shipping container garage is only as strong as the foundation it rests on, and getting this part right is non-negotiable. It’s what stops a whole host of future problems, from doors that refuse to align to water pooling around the base and inviting rust.
The goal is simple: create a perfectly level, stable, and well-drained surface that will support the immense weight of the container and everything you put inside it for years to come.
This visual shows a perfectly prepared site, ready with paving slabs to ensure a solid foundation for the container's arrival.
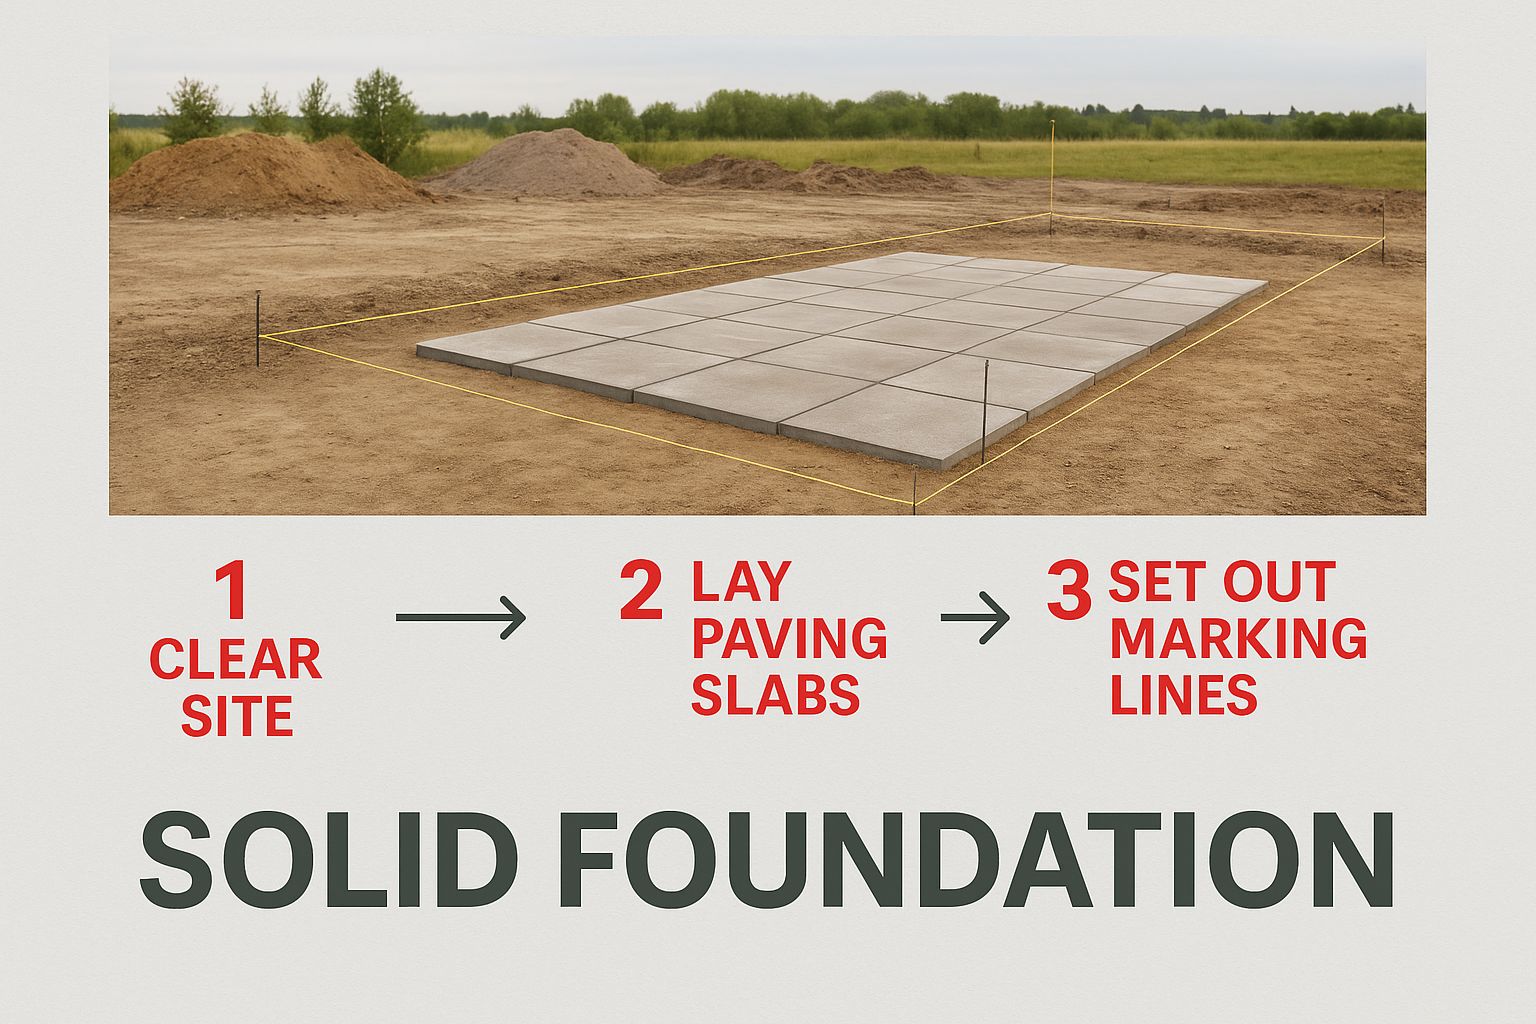
If there's one thing to remember, it's that a level and secure base is the cornerstone of a successful project. It's the key to stability and longevity.
Choosing Your Foundation Type
The right foundation for your container garage really boils down to your site's ground conditions, your budget, and whether you want a temporary or permanent solution. If you're lucky enough to have firm, level ground, simpler options are often perfectly adequate.
- Paving Slabs: A cost-effective and hugely popular choice. Placing thick, high-quality paving slabs under each of the four corner castings provides excellent support on stable ground. For a 40ft container, it's a good idea to add two extra slabs in the middle for good measure.
- Railway Sleepers: Reclaimed or new railway sleepers offer a robust and straightforward base. Just lay them perpendicular to the container's length, and they'll distribute the weight evenly while lifting the unit off the ground. This promotes airflow and is brilliant for preventing moisture build-up.
For sites with uneven terrain or softer ground, however, you'll need to think about a more substantial approach to guarantee long-term stability.
More Permanent Foundation Solutions
If your site is on a slope or you're planning a more permanent installation, you'll need to invest in a more robust foundation. These methods take more effort and cash but provide unbeatable stability.
A concrete pier foundation is a great option. It involves digging holes at each corner (and midway points for a 40ft container) and filling them with concrete. This creates solid pillars that can be set to the exact same height, giving you a perfectly level base no matter what the ground's natural slope is doing.
Alternatively, a full concrete slab offers the ultimate in stability and creates a solid floor for your garage from the get-go. It's the most expensive option, often costing several thousand pounds, but it provides an unshakeable, perfectly level platform that eliminates any worries about ground movement.
Whichever method you choose, the absolute priority is getting that surface level. A container that isn't level will twist. When that happens, the cargo doors will jam and become incredibly difficult to open and close—a major headache you really want to avoid.
Ensuring Proper Levelling and Drainage
Levelling is the final, crucial check. Even with a perfectly prepared base, small adjustments are often needed once the container is delivered. A laser level is the best tool for this, but a long spirit level can also do the job. You can use shims or dedicated levelling feet to make tiny adjustments at the corners until the container is perfectly flat.
For a detailed walkthrough, our guide on how to level a shipping container offers practical, step-by-step advice.
Finally, don't forget about drainage. You absolutely must ensure water can flow away from the container, not towards it. A slight gradient away from the foundation or installing a simple French drain can prevent water from pooling at the base, which is the number one enemy in the fight against rust.
Taking the time to get the groundwork right first time will save you from a world of costly and frustrating problems down the road.
Essential Customisations for a Functional Garage
With a solid foundation in place, your shipping container is ready for its real transformation. This is the exciting part, where a simple steel box evolves into a fully functional and practical garage. Getting these key customisations right is what separates a basic storage box from a usable, secure space that protects your vehicle and tools from the elements day in, day out.
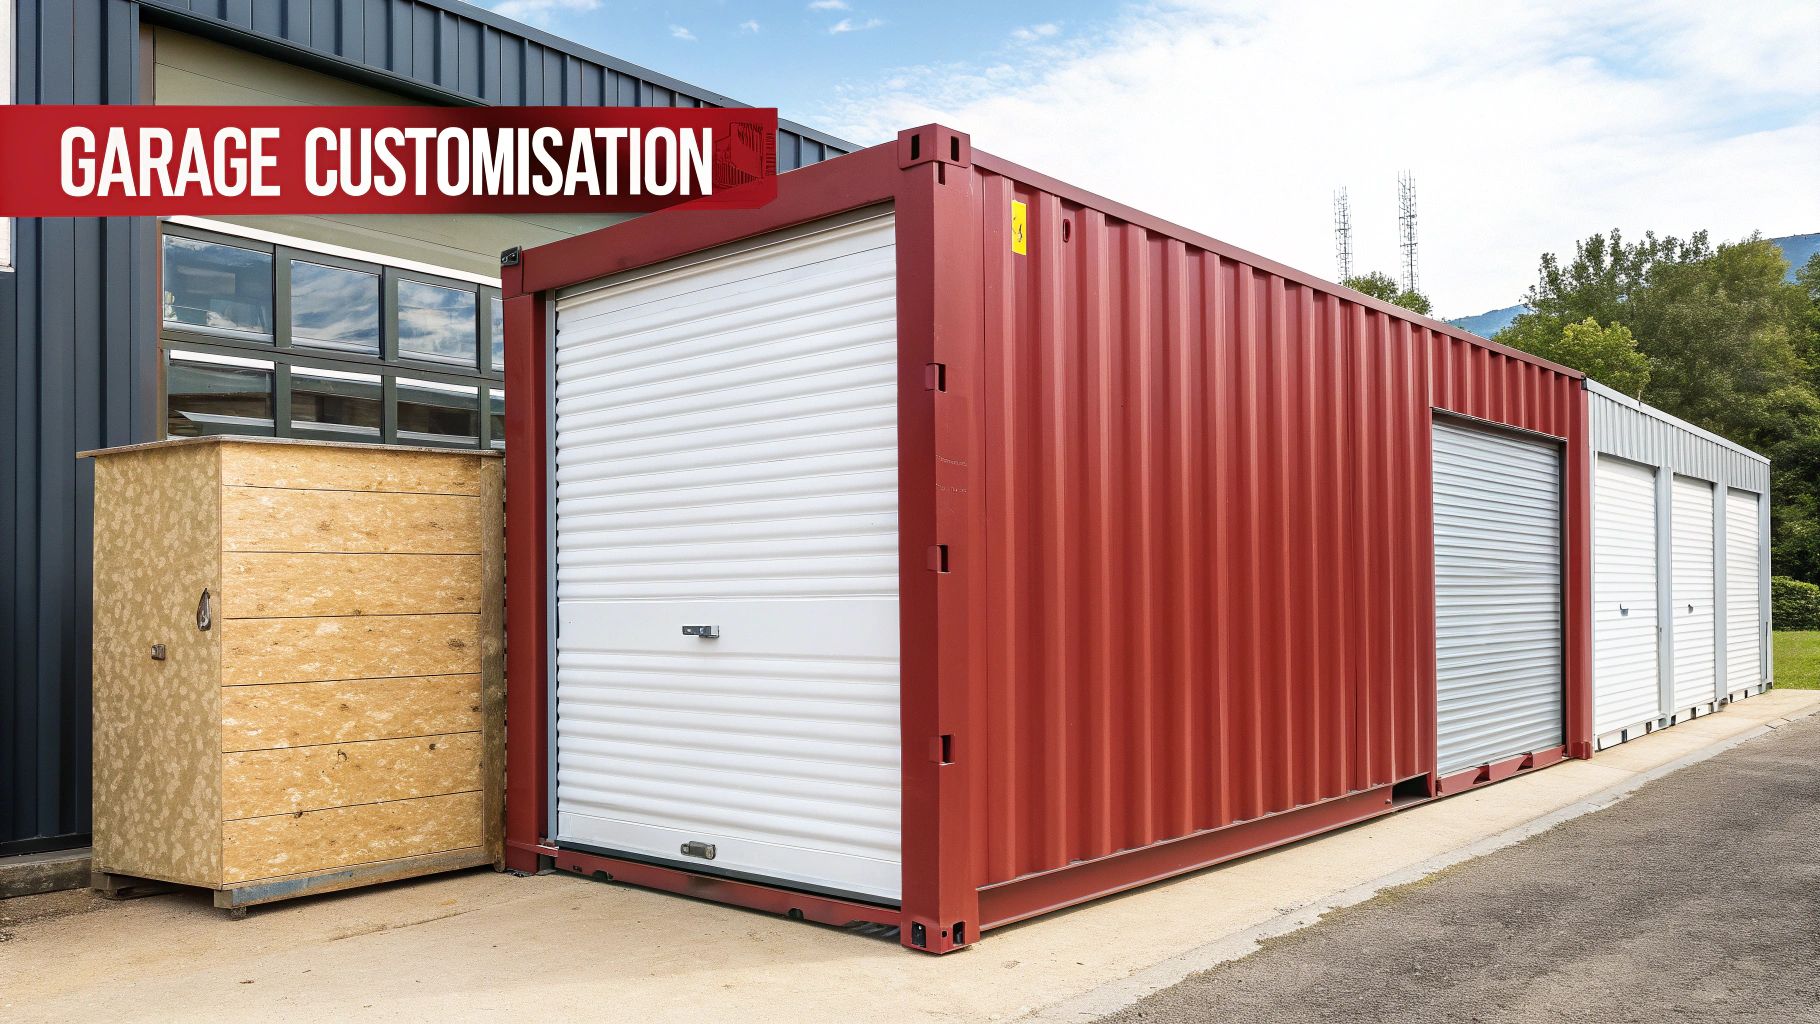
The first and most significant change is swapping out those heavy, cumbersome cargo doors for a proper garage door. Trust me, this single upgrade makes the biggest difference in turning your container into a genuine, accessible garage.
Installing the Right Garage Door
The original container doors are incredibly secure, but they're a nightmare for daily vehicle access. Installing a purpose-built garage door is pretty much a non-negotiable step. When you start looking, you'll find the two most popular choices are roll-up and sectional doors, and each has its own clear advantages for a shipping container as garage project.
Before we dive into the options, here's a quick comparison to help you weigh them up.
Garage Door Options for Container Conversions
| Door Type | Pros | Cons | Estimated Cost (£) |
|---|---|---|---|
| Roll-Up Door | Space-saving (rolls into a box), simpler to install, generally more affordable. | Less insulated, can be less secure than sectional doors. | £600 - £1,500 |
| Sectional Door | Excellent insulation and a tighter seal, higher security, more aesthetic options. | Requires more interior ceiling space for tracks, more complex installation. | £900 - £2,500+ |
| Barn Doors (Custom) | Great aesthetic, can be highly secure, no overhead space required. | Can be heavy and awkward, requires swing space, often a custom job. | £800 - £3,000+ |
Choosing between a roll-up and a sectional door really comes down to your priorities. Roll-up doors are often the go-to because they are so compact. They coil up neatly into a box just above the opening, which is brilliant for saving that precious ceiling space inside your garage. They also tend to be a bit friendlier on the wallet and simpler to install.
On the other hand, sectional doors run on tracks up and along the ceiling. They usually offer much better insulation and a tighter seal against the weather, a huge plus for climate control. The downside? They eat up more of your interior headroom to operate.
Whichever door you choose, it instantly becomes your main access point and a potential weak spot. Don't skimp here—invest in a quality, secure model. For an extra layer of protection, especially overnight, it's worth exploring options for enhancing vehicle security with bollards as part of your overall setup.
Tackling Condensation with Ventilation
One of the biggest headaches with any sealed metal box is condensation. As the temperature outside drops, moisture in the air condenses on the cold steel ceiling and walls. Before you know it, you've got dampness, mould, and eventually, rust. Effective ventilation is the only real way to fight back.
Simple static vents are an easy fix. You just cut an opening, pop the vent in, and seal it up. These allow for passive airflow but might not be enough to handle the damp UK climate on their own. A much better solution is a whirlybird turbine vent, which uses even a slight breeze to actively suck moist air out of the container.
A Quick Tip From Experience: Preventing condensation isn't just about keeping your tools from rusting; it's about protecting the container itself. Constant dampness will eventually lead to serious corrosion. A small investment in good ventilation now will save you from major structural headaches down the line.
Choosing the Best Insulation
While ventilation deals with moist air, insulation is your best defence against the temperature swings that cause condensation in the first place. An uninsulated container is an icebox in winter and an oven in summer, making it a miserable place to work.
There are a few excellent insulation options to consider:
- Spray Foam: This is the top-tier choice. It creates a seamless, airtight barrier that completely seals the interior. It’s a professional job and costs the most, but nothing beats it for thermal performance and stopping condensation in its tracks.
- Rigid Foam Boards: Polystyrene or polyisocyanurate boards are a brilliant DIY-friendly option. You can cut them to fit perfectly between wooden framing battens and they offer great insulation value for their thickness.
- Mineral Wool: A more traditional and breathable material, mineral wool is very effective and has the bonus of being non-combustible. You just need to be careful to fit it behind a vapour barrier to stop it from getting damp.
Properly insulating your shipping container garage will make it a comfortable, usable space no matter the season.
Adding Doors and Windows for Access and Light
Last but not least, think about how you'll actually use the space. You're not going to want to roll up the main garage door every time you need to grab a spanner. Installing a personnel door gives you quick, easy access without compromising security or letting all the heat out.
Windows are another game-changer. They let in natural light and make the space feel less like a dark, claustrophobic box and more like a proper workshop.
Cutting openings for doors and windows does require careful framing with steel box sections to maintain the container's structural strength. It's critical that these are properly welded and weatherproofed to prevent any leaks. If you're planning on adding glazing yourself, our guide on how to install container windows gives you the full step-by-step instructions.
Finishing the Interior and Exterior
Right, with the heavy lifting done, your container garage is now structurally sound and properly weatherproofed. The next step is where the real transformation happens—turning that steel box into a polished, genuinely usable space. It's all about the finishing touches: getting the electrics sorted safely, picking the right floor, and giving the exterior a finish that'll last.
Installing Electrics Safely
Let’s be honest, you'll need power in your garage for lighting, tools, or maybe even charging an electric car. While tackling the wiring yourself might seem tempting, doing electrical work inside a giant metal box is a different beast entirely. Steel is conductive, and a simple mistake could have disastrous consequences.
This is non-negotiable: you absolutely must hire a qualified and registered electrician. They know exactly how to make sure the whole installation is safe, compliant with UK regulations, and correctly earthed.
A professional will handle things like:
- Installing a dedicated consumer unit (fuse box) just for the garage.
- Securely mounting sockets and switches.
- Fitting tough, hardwearing lighting that can handle a workshop environment.
They’ll use the correct conduits and trunking to shield the cables from the steel walls, giving you total peace of mind. Seriously, don’t try to save a few quid here. Safety has to be priority number one.
Choosing Durable Interior Flooring
The marine-grade plywood floor that comes standard in shipping containers is tough, no doubt about it. But for a garage, where you’re dealing with oil spills, dropped tools, and constant foot traffic, it’s not quite up to the job. Upgrading the flooring will not only look better but will also add a crucial layer of protection and make it a breeze to clean.
Here are a few practical options to consider:
- Rubber Matting: This is a brilliant, non-slip solution. You can get it in rolls or as interlocking tiles, and it’s dead easy to install. It also provides a bit of cushioning underfoot and is incredibly resistant to stains and impacts.
- Epoxy Floor Coating: If you want a seamless, rock-solid finish, a two-part epoxy coating is unbeatable. It creates a waterproof, chemical-resistant surface that you can wipe clean in seconds—perfect for a busy workshop.
- Heavy-Duty Plywood: On a tighter budget? You can simply seal the existing floor or lay another layer of heavy-duty plywood on top and coat it with durable floor paint. It’s a cost-effective way to get a clean, functional surface.
Protecting and Painting the Exterior
The finish on the outside of your container garage does two things: it protects the steel from our famously damp British weather, and it makes it look the part. A proper paint job is your first and most important line of defence against rust.
The secret to a finish that lasts is all in the prep work. Start by giving the entire exterior a thorough clean to get rid of any dirt, grease, or grime. Then, tackle any surface rust by grinding it back to bare metal and immediately applying a good rust-inhibiting metal primer.
For the topcoat, don't just grab any old exterior paint. You need a high-quality, direct-to-metal or marine-grade paint. This stuff is specially designed to stick to steel and withstand harsh conditions, offering you years of protection. A couple of coats will give you a robust and even finish.
Transforming the Look with Cladding
While a neatly painted container has a cool, industrial vibe, you might want something that blends in a bit more with your garden or the rest of your property. This is where exterior cladding comes in, completely changing the look and feel of the container.
Timber cladding is a really popular choice, giving the garage a warm, natural aesthetic that can be stained or painted to match your house. If you want something low-maintenance, composite panels are a great modern alternative and come in a huge range of colours and finishes. To make sure any exterior wood lasts, it’s worth knowing how to protect wood outdoors in the UK.
Cladding isn't just about looks, either. In some areas, it might even be a requirement to get planning permission. Plus, it adds another layer of weather protection and can even boost insulation, making it a smart investment for the ultimate container garage.
Common Questions About Container Garages
Thinking about turning a shipping container into a garage? It's a solid, practical idea, but it’s normal to have a few questions swirling around, from dealing with the council to keeping it in good nick for the long haul.
Getting these details ironed out from the start is the best way to make sure your project goes off without a hitch. Let's get into the most common questions we hear.
Do I Always Need Planning Permission in the UK?
Not always, but you absolutely have to check with your local council first. In some cases, a container might fall under 'permitted development' rights, especially if it's seen as a temporary structure and fits within certain size and location rules on your property.
However, don't just assume this will be the case. Many councils will classify it as a permanent building, which means you'll need to go through a full planning application. The best thing you can do to avoid a costly headache is to call your local planning authority before you even think about buying or arranging delivery. That one phone call can save you a world of trouble.
How Can I Stop a Container Garage from Rusting?
Shipping containers are built tough from Corten steel, which is naturally rust-resistant, but even they need a bit of help to stand up to the good old British weather. Your best defence starts the moment you buy it: pick a unit with as little rust as possible and be ready to treat any spots you find straight away.
Here’s a simple maintenance checklist to keep on top of it:
- Grind any visible rust spots right back to the bare metal.
- Get a quality rust-inhibiting primer on the treated areas.
- Finish it off with at least two coats of a durable, marine-grade paint.
Don't forget the foundation, either. A solid base with proper drainage is key to stopping water from pooling around the bottom. A quick check for new scratches every so often and a quick touch-up will keep your container garage looking sharp for years to come.
By their very nature, containers are built to last. The key is proactive maintenance. A little bit of care each year goes a long way in preventing corrosion and preserving the structural integrity of your garage.
What Is the Typical Cost of a Container Garage Conversion?
This is a classic "how long is a piece of string?" question. The final cost really depends on the size of the container you go for and how much you want to customise it. As a starting point, a used 20ft container will likely set you back somewhere between £1,500 and £2,500.
From there, you’ve got to add in the other bits and pieces. A foundation could be a few hundred quid for simple paving slabs or climb over £1,000 for a full concrete base. A good roll-up garage door can add another £800 - £2,000+, and getting a professional to sort out the electrics could be £500 - £1,500.
Once you factor in insulation, ventilation, and any other personal touches, a basic DIY job could start around the £4,000 mark. If you’re planning a more comprehensive, fully-fitted conversion, it could easily push past £10,000.
Is a Shipping Container Garage Actually Secure?
Absolutely. A sealed steel box is an incredibly tough nut to crack, making it a brilliant deterrent for thieves. The only real weak points are the modifications you make, like adding doors and windows.
This is where you need to be smart. Invest in a high-quality, secure garage door and a seriously robust lock for any side personnel door you install. Windows are great for letting in natural light, but they can be a vulnerability. Think about using reinforced glass or adding security shutters if you want that extra peace of mind. With the right choices for your access points, a container garage can be leagues more secure than a lot of traditional builds.
At Quickfit Container Accessories, we stock all the essential parts you need to customise your container garage safely and effectively. From ventilation to secure locking mechanisms, we have the right solutions to complete your project. Explore our full range of accessories at https://www.quickfitcontaineraccessories.co.uk.