Website Orders To Northern Ireland & Republic Of Ireland and USA Now Available!


UK Shipping Container Insulation: A Complete Guide
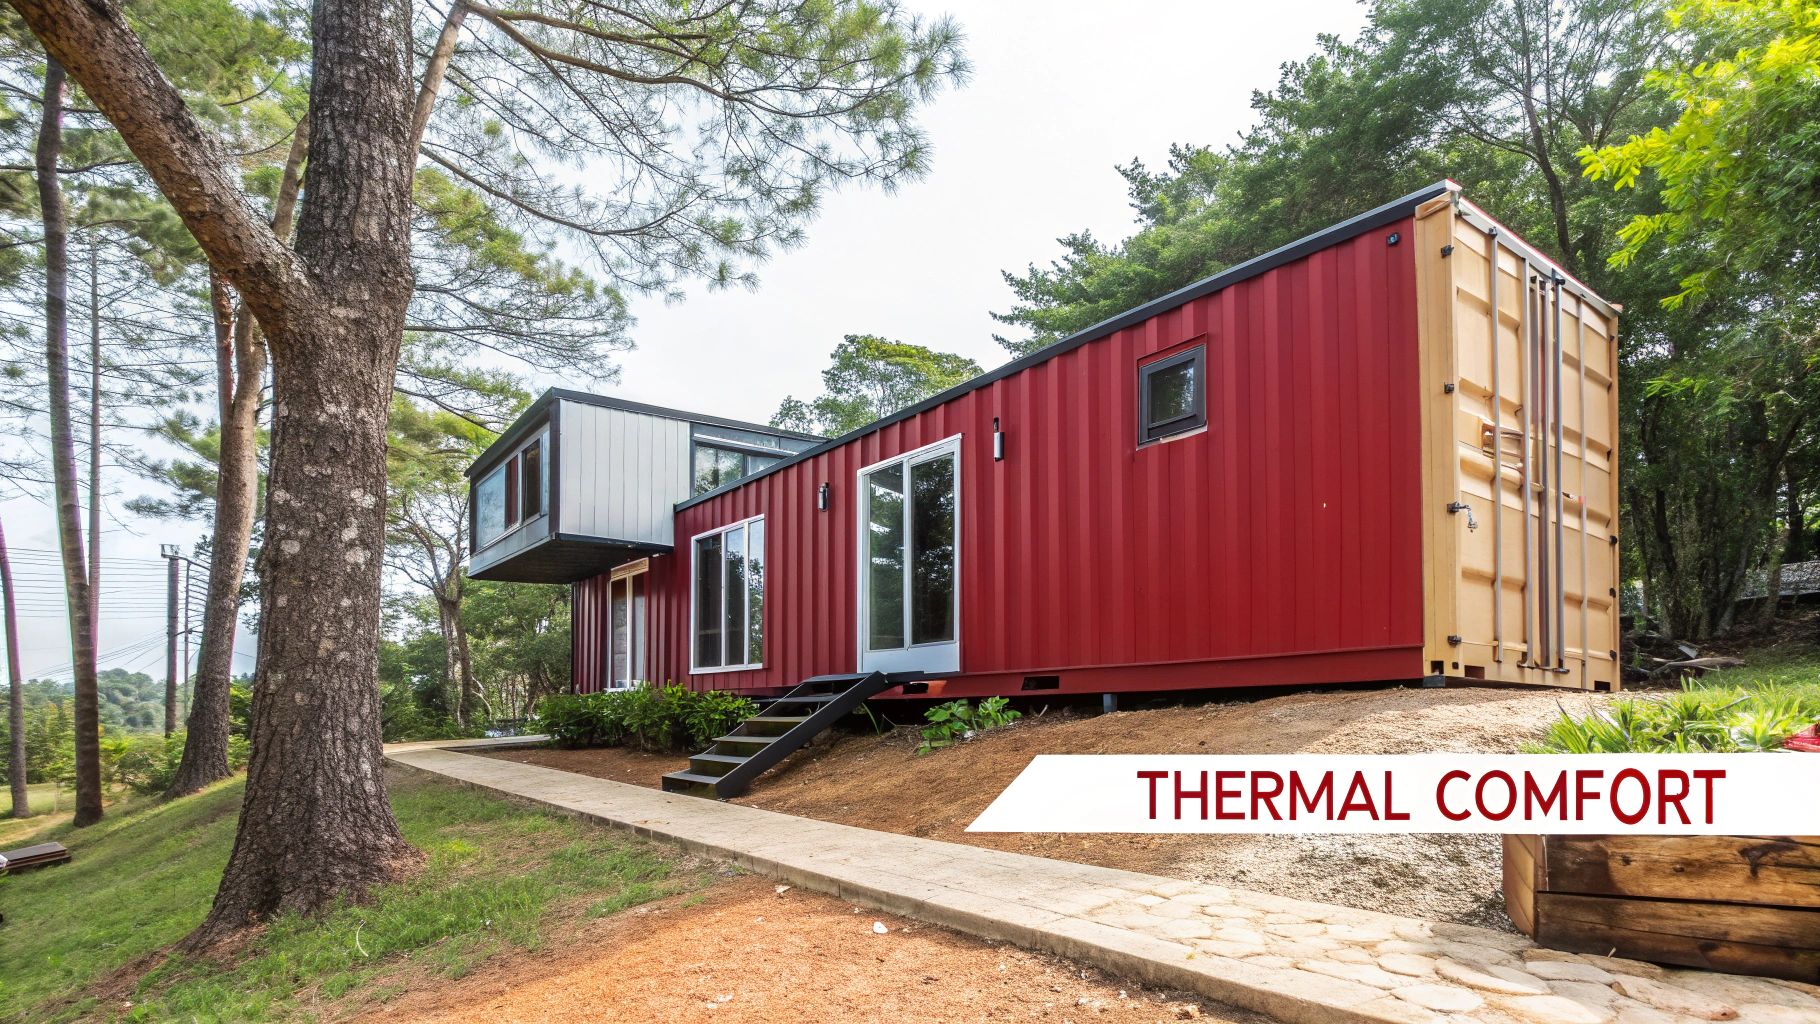
A shipping container might seem like a brilliant blank canvas for your next project, but without proper shipping container insulation, it’s really just a metal tent. It’ll be freezing in the winter and sweltering in the summer. Getting the insulation right is hands down the most important step in any conversion, turning a simple steel box into a comfortable, genuinely usable space.
Why You Must Insulate Your Shipping Container
Just picture trying to work or relax inside a metal box on a chilly British morning. The thin steel walls offer almost zero resistance to the cold, so the inside feels just as frosty as the outside. This happens because steel has a high thermal conductivity, which is a fancy way of saying it transfers heat (and cold) incredibly well.
But this rapid temperature change isn't just about comfort. It’s the root cause of a much more destructive problem: condensation. When the warm, moist air you create inside the container hits those cold steel walls, it instantly condenses into water droplets. We're talking about a phenomenon often called "container rain," and it can lead to a whole host of issues.
The Dangers of an Uninsulated Container
If you skip the insulation, you're risking a lot more than just feeling a bit chilly. The constant moisture from condensation creates the perfect breeding ground for mould and mildew, which can ruin your belongings and even pose health risks.
Even worse, that persistent dampness starts to attack the container itself. The very steel that makes these containers so tough is surprisingly vulnerable to rust when it's constantly wet. Insulation acts as a crucial protective shield. It creates a thermal barrier that keeps the interior surfaces warmer, stopping condensation before it even has a chance to form.
Key Takeaway: Insulation isn't just a "nice-to-have." It’s absolutely fundamental to the structural integrity and usability of your container. It prevents rust, stops condensation, and creates a stable, habitable environment.
Before we dive into the specific types of insulation, let's quickly summarise the core problems and how insulation solves them.
Key Problems and Insulation Solutions
| Problem | Solution (Insulation) | Benefit |
|---|---|---|
| Extreme Temperatures | Creates a thermal barrier, slowing heat transfer. | A stable, comfortable internal climate year-round. |
| Damaging Condensation | Keeps interior walls warm, preventing moisture build-up. | Stops "container rain," mould, and mildew growth. |
| Structural Degradation | Stops condensation, which is the primary cause of rust. | Protects the steel and extends the container's lifespan. |
| High Energy Bills | Reduces the need for constant heating or cooling. | Lower energy consumption and running costs. |
As you can see, the benefits go far beyond just feeling comfortable.
Beyond Temperature Control: The Core Benefits
The advantages of a well-insulated container are massive, especially for any serious project here in the UK.
- Structural Protection: By preventing rust-causing condensation, you dramatically extend the life of your container.
- Energy Efficiency: A stable internal temperature means you'll spend far less on heating or cooling. This is vital whether you're building an office, a workshop, or a home, and it’s especially important for optimising energy efficiency in off-grid system design.
- Habitability: It's the step that transforms the container from a storage box into a genuinely comfortable space you can actually live, work, or relax in.
The costs involved reflect just how important this is. In the UK, a basic anti-condensation treatment might start around £15 per square metre. But if you're creating a habitable space that needs to meet Building Regulations, you could be looking at £50 per square metre or more. This just goes to show that proper insulation is a critical upfront investment, not an optional extra.
Choosing the Right Insulation Material
Picking the right insulation for your shipping container insulation project is one of the biggest calls you'll make. It’s not just about warmth; the material you choose affects everything from the comfort inside to how tricky the installation is, the total cost, and even how you finish the interior walls. There's no magic "best" material—it all boils down to what you're trying to achieve.
Are you building a full-time home office that needs to meet UK building regs? Or are you just trying to stop condensation from wrecking your tools in a container workshop? Each goal demands a different solution. Let’s walk through the most common options in the UK to help you get it right.
Spray Foam Insulation: The Airtight Solution
Spray foam is often seen as the top-tier choice for container projects, and for good reason. It’s applied as a liquid that expands to fill every single gap, crack, and crevice, creating one solid, seamless barrier. This is what makes it so brilliant at stopping both heat loss and the dreaded condensation.
But not all spray foam is the same. It's crucial to know the difference between the two main types:
- Closed-Cell Spray Foam: This is the dense, rigid version. Think of it as an all-in-one solution: it’s your insulation, air barrier, and vapour barrier in a single application. Its high R-value per inch is perfect for the shallow walls of a container, giving you maximum insulation without eating up too much precious interior space. Its rigidity even adds a bit of structural strength to the container walls.
- Open-Cell Spray Foam: This type is lighter, feels more like a sponge, and is usually cheaper. While it’s a great insulator and air blocker, it lets moisture pass through, meaning you’ll need to install a separate vapour barrier. For the damp-prone steel shell of a container, closed-cell is almost always the recommended choice.
Closed-cell spray foam’s knack for creating a perfect air and moisture seal in one go makes it the gold standard for container conversions, especially for living spaces where top performance is a must.
Rigid Foam Board Insulation: The DIY Favourite
Rigid foam boards, usually made from Polyisocyanurate (PIR) or Expanded Polystyrene (EPS), are a massive hit with the DIY crowd. These lightweight panels are a breeze to handle and cut, making the job straightforward for anyone with basic DIY skills.
They pack a decent R-value for their thickness and you can grab them in various sizes from most builders' merchants. The secret to a good foam board job is being meticulous. You have to cut the boards for a snug fit between your timber framing, then use expanding foam or high-quality tape to seal every last joint and gap. Miss one, and you’ve created a thermal bridge—a cold spot where condensation can form, completely undermining all your hard work.
The image below gives a quick visual rundown of how the common insulation types compare on performance and cost.
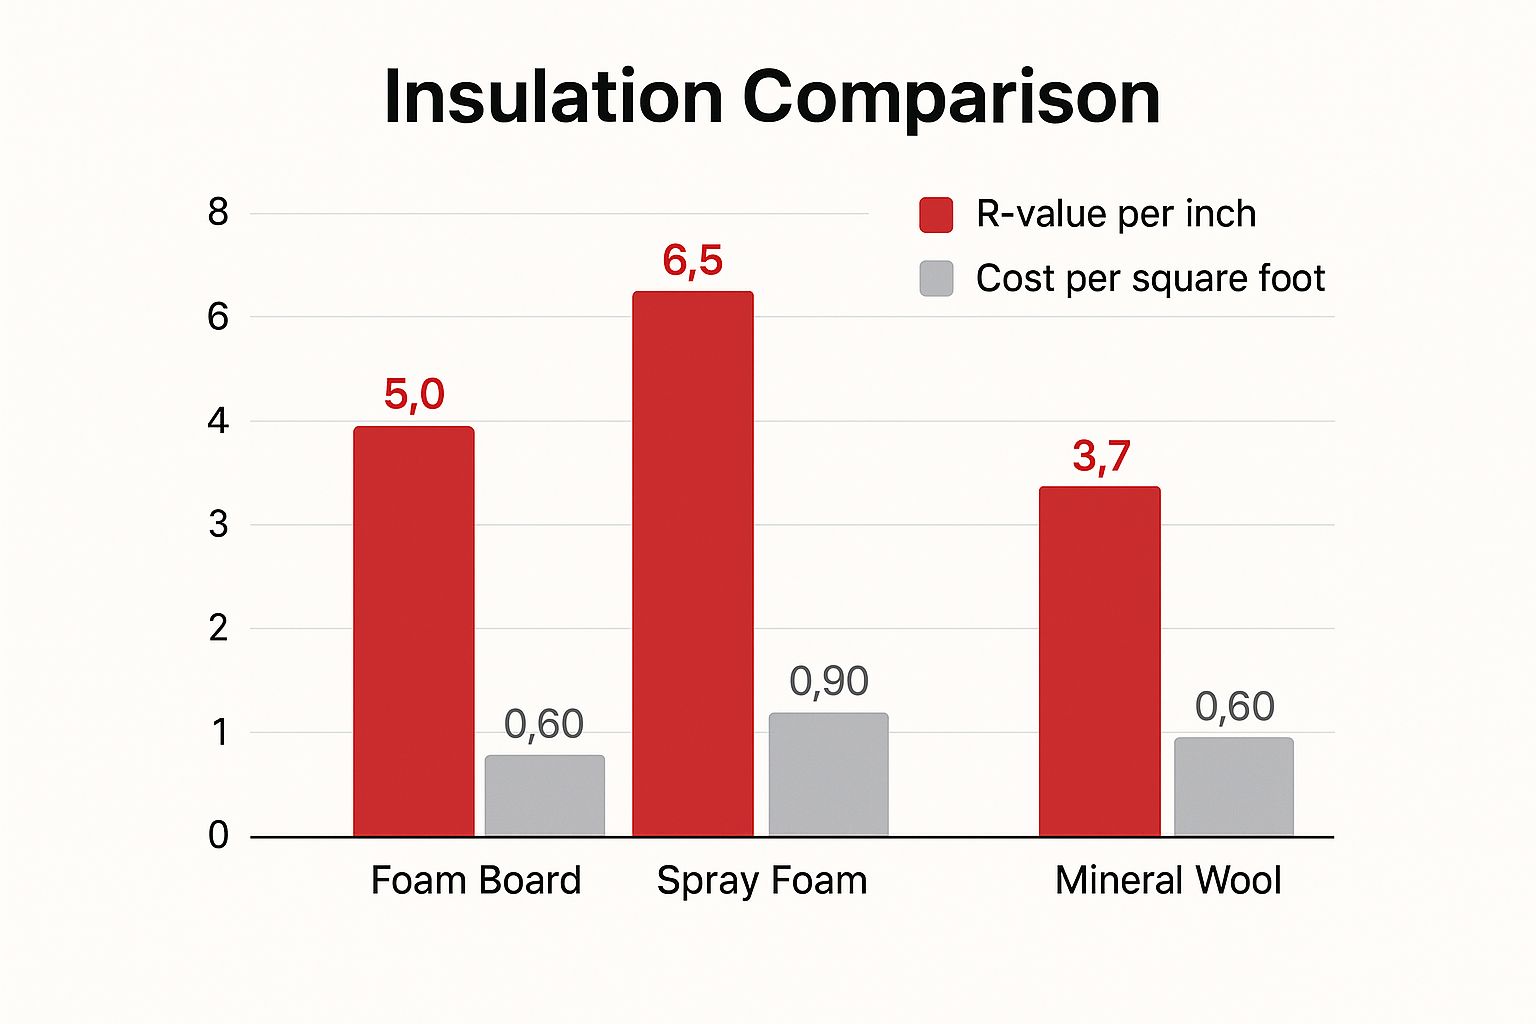
As you can see, spray foam generally delivers the best thermal performance (R-value) for its thickness, whereas options like mineral wool offer a more budget-friendly path with a lower R-value.
Blanket Insulation: The Traditional Approach
Blanket insulation, which you’ll find in rolls or "batts," covers materials like mineral wool (often known by brand names like Rockwool), sheep's wool, or even recycled denim. This is usually the most wallet-friendly option and will look familiar to anyone who’s ever peeked inside a standard wall cavity.
It's flexible and easy to stuff into the gaps in your timber frame. The big downside, however, is its vulnerability to moisture. If standard blanket insulation gets wet, it slumps down and loses most of its insulating power. Worse, a damp batt squashed against the container's steel wall is a perfect recipe for rust.
For that reason, if you go with blanket insulation, a perfectly installed, high-performance vapour barrier on the "warm" side of the insulation isn't just a good idea—it’s absolutely vital. Some people find that pairing solid insulation with an external finish gives them the best of both worlds. You can dive deeper into this in our guide on shipping container cladding. This approach helps shield the structure itself and can really lift the final look.
Comparison of Common Insulation Materials
To help you weigh up the options, we’ve put together a table comparing the most common insulation materials side-by-side. This should give you a clearer picture of which material might be the best fit for your specific project, budget, and performance needs.
| Material Type | Average R-Value per Inch | Pros | Cons | Best For |
|---|---|---|---|---|
| Closed-Cell Spray Foam | R-6.0 to R-7.0 | Highest R-value; acts as air, vapour, and moisture barrier; adds structural rigidity. | Expensive; requires professional installation; off-gassing during application. | Habitable spaces (homes, offices) where performance and space-saving are critical. |
| Rigid Foam Board (PIR/EPS) | R-3.8 to R-6.5 | Good R-value; DIY-friendly; moisture resistant; easy to source. | All joints must be meticulously sealed to prevent thermal bridging; can be brittle. | DIY projects, workshops, and storage units where cost and ease of installation are factors. |
| Mineral Wool Batts | R-3.0 to R-3.3 | Cost-effective; good soundproofing; fire-resistant. | Lower R-value; susceptible to moisture (loses performance when wet); requires a separate vapour barrier. | Budget-conscious projects, sheds, or workshops where moisture can be strictly controlled. |
| Sheep's Wool | R-3.5 to R-3.8 | Natural and sustainable; breathable (manages moisture); good insulator. | More expensive than fibreglass/mineral wool; can attract pests if not treated. | Eco-friendly builds and projects where breathability is a priority. |
Choosing the right material is a balancing act between performance, cost, and the specific demands of your container conversion. Whether you need the top-tier, all-in-one protection of spray foam or the budget-friendly approach of blanket insulation, understanding these trade-offs is the key to a successful, comfortable, and long-lasting project.
Understanding R-Values And UK Building Regulations
When you start digging into shipping container insulation, one term you'll see pop up everywhere is the 'R-value'. What does it actually mean for your project? The easiest way to think of it is like the 'tog' rating on a duvet. A high tog means a warmer duvet, and a high R-value means the material is better at resisting heat flow.
This resistance is what it's all about. A high R-value is your best defence against a chilly British winter, keeping warmth locked inside. In a summer heatwave, it does the opposite, preventing the space from turning into an oven. It’s a straight-up measure of thermal performance, and getting your head around it is the first step to creating a comfortable, energy-efficient container space.
It’s also worth knowing that R-values add up. If your wall has multiple layers—say, a timber frame, your insulation, and then the interior cladding—each layer’s R-value contributes to the total. This cumulative effect is a key principle when you’re planning how to hit the performance targets your project needs.
Why R-Values Are Not Just A Suggestion
If you’re just using a container for basic storage, a bit of insulation with a modest R-value might be enough to keep the worst of the damp and condensation at bay. But the moment you plan to turn that container into a habitable space—a home, a garden office, or a workshop—you’ve entered the world of UK Building Regulations.
These aren't just friendly guidelines; they are legal requirements. They exist to make sure buildings are safe, healthy, and energy-efficient. For container conversions, Part L (Conservation of fuel and power) is the big one. It lays down the minimum thermal performance standards needed to cut down on energy consumption.
Meeting these standards is non-negotiable. If you fall short, you’ll end up with a space that’s uncomfortable and expensive to run. Worse, you could run into serious trouble getting the project signed off by building control, which can lead to costly rework or even being forced to undo what you’ve built.
Meeting UK Building Regulations
The specific R-value (or its technical cousin, the U-value) you need will depend on which part of the building you’re insulating—wall, floor, or roof—and the details of your project. While the exact numbers can vary, one thing is certain: aiming for high performance from the start is always the best approach.
Key Insight: Hitting the required R-values isn't just about ticking a compliance box. It’s about future-proofing your investment. A well-insulated container means significantly lower running costs, a much higher comfort level, and a better resale value down the line.
To meet these strict requirements, you’ll need insulation with a high R-value per inch, especially since space inside a container is so precious.
- Walls: You will almost certainly need a high-performance insulation like closed-cell spray foam or thick PIR rigid foam boards. This is the only way to hit the target R-values without eating up too much of your interior space.
- Roof: The roof is a huge source of heat loss in winter and heat gain in summer. It often demands an even higher R-value than the walls to be effective.
- Floor: Don't forget the floor! It’s just as vital for overall comfort and energy efficiency, stopping the cold from seeping up from the ground.
Getting a firm grasp of these thermal performance requirements right at the beginning is crucial. It will shape your choice of shipping container insulation material and the entire design of your internal framing. A proactive approach here will save you from a world of headaches and unexpected costs, ensuring you create a space that’s comfortable, efficient, and fully compliant with UK law.
How to Master Moisture and Ventilation
Insulating a shipping container is a brilliant move for creating a comfortable space, but it brings a new challenge to the table that you absolutely cannot ignore: moisture. When you create a well-insulated, airtight box, you also trap every bit of moisture generated inside. Without a solid plan, this leads straight to "container sweat," where condensation builds up, causing damp, mould, and eventually, rust.
Think of your newly insulated container as a sealed flask. Every breath you take, every cuppa you make, and even the natural humidity in the air releases water vapour. When this warm, damp air hits the cold steel shell—even from behind your new insulation—it condenses back into liquid water. This is where the real trouble starts.
Getting on top of this problem comes down to a two-part strategy: stopping moisture from ever reaching the steel, and giving any moisture that does form a clear path to escape. Get this combination right, and you'll protect the container's structure and everything inside it.
The Crucial Role of a Vapour Barrier
The single most important weapon in your arsenal against container condensation is the vapour barrier, sometimes called a vapour control layer. This is a thin, impermeable membrane, usually polythene sheeting, that you install on the warm side of your insulation—in other words, just behind your interior walls.
Its job is simple but absolutely vital. It physically blocks the warm, humid air from inside your living or working space from passing through the insulation and hitting the cold steel surface. This separation is the key to preventing what's known as interstitial condensation—the nasty moisture that gets trapped right inside the wall structure itself.
Key Insight: A vapour barrier isn't just an optional extra; it's a non-negotiable part of any successful insulation job. Forgetting it is like building a boat with a tiny, slow leak. It might seem okay at first, but disaster is just a matter of time.
When you're fitting a vapour barrier, perfection is the only acceptable standard. Every single seam must be overlapped and taped with specialised airtight tape. You have to seal it meticulously around any openings for windows, doors, or electrical outlets. Any gap, no matter how small, becomes a weak spot where moisture can sneak through and completely undermine all your hard work.
Creating a Breathable Space with Ventilation
Even with a flawless vapour barrier in place, you still need to deal with the air quality and humidity inside the container. This is where ventilation comes in. A good ventilation strategy is all about pulling stale, moist air out and replacing it with fresh, dry air from outside.
The type of ventilation you’ll need depends entirely on what you plan to do with the container.
- Passive Vents for Simple Storage: If you're just using the container for straightforward storage, a few simple passive vents might be all you need. These allow air to move naturally through the space, helping to cut down on condensation. For a deeper look at this, you can check out our detailed guide on how to reduce condensation in shipping containers.
- Active Ventilation for Habitable Spaces: For any space that people will use regularly—like a home office, a workshop, or a living area—passive vents just won't cut it. You'll need a powered, or 'active', ventilation system. This could be as simple as an extractor fan in a kitchen or bathroom area.
- Mechanical Heat Recovery Ventilation (MHRV): For the absolute best in climate control and energy efficiency, an MHRV system is the gold standard. It uses a heat exchanger to warm up the incoming fresh air using the heat from the stale air it’s pushing out. This means you get a constant supply of fresh air without losing all the warmth you've paid to create, keeping your space healthy and your energy bills down.
Preventing damp is vital for the long life of your container and whatever you keep inside it. Understanding broader damp proofing solutions can be a huge help when planning your project. By combining the right insulation with a meticulously installed vapour barrier and a smart ventilation strategy, you create a robust system that keeps your container dry, healthy, and durable for years to come.
Your Step-By-Step Installation Guide
Taking on a shipping container insulation project yourself can be a hugely rewarding job. While some parts, like applying spray foam, are definitely best left to the pros, a confident DIYer can get fantastic results with materials like rigid foam boards or insulation blankets. This guide breaks the whole process down into manageable stages, giving you a clear roadmap from a bare steel box to a fully insulated space.
The foundation of any good installation is meticulous prep. Before a single piece of insulation goes in, you need to make sure the container's interior is a perfect blank canvas.
- Thorough Cleaning: Start by giving the entire inside a proper deep clean. Get a pressure washer and a strong degreaser to shift any dirt, grime, or chemical residues left over from its life at sea.
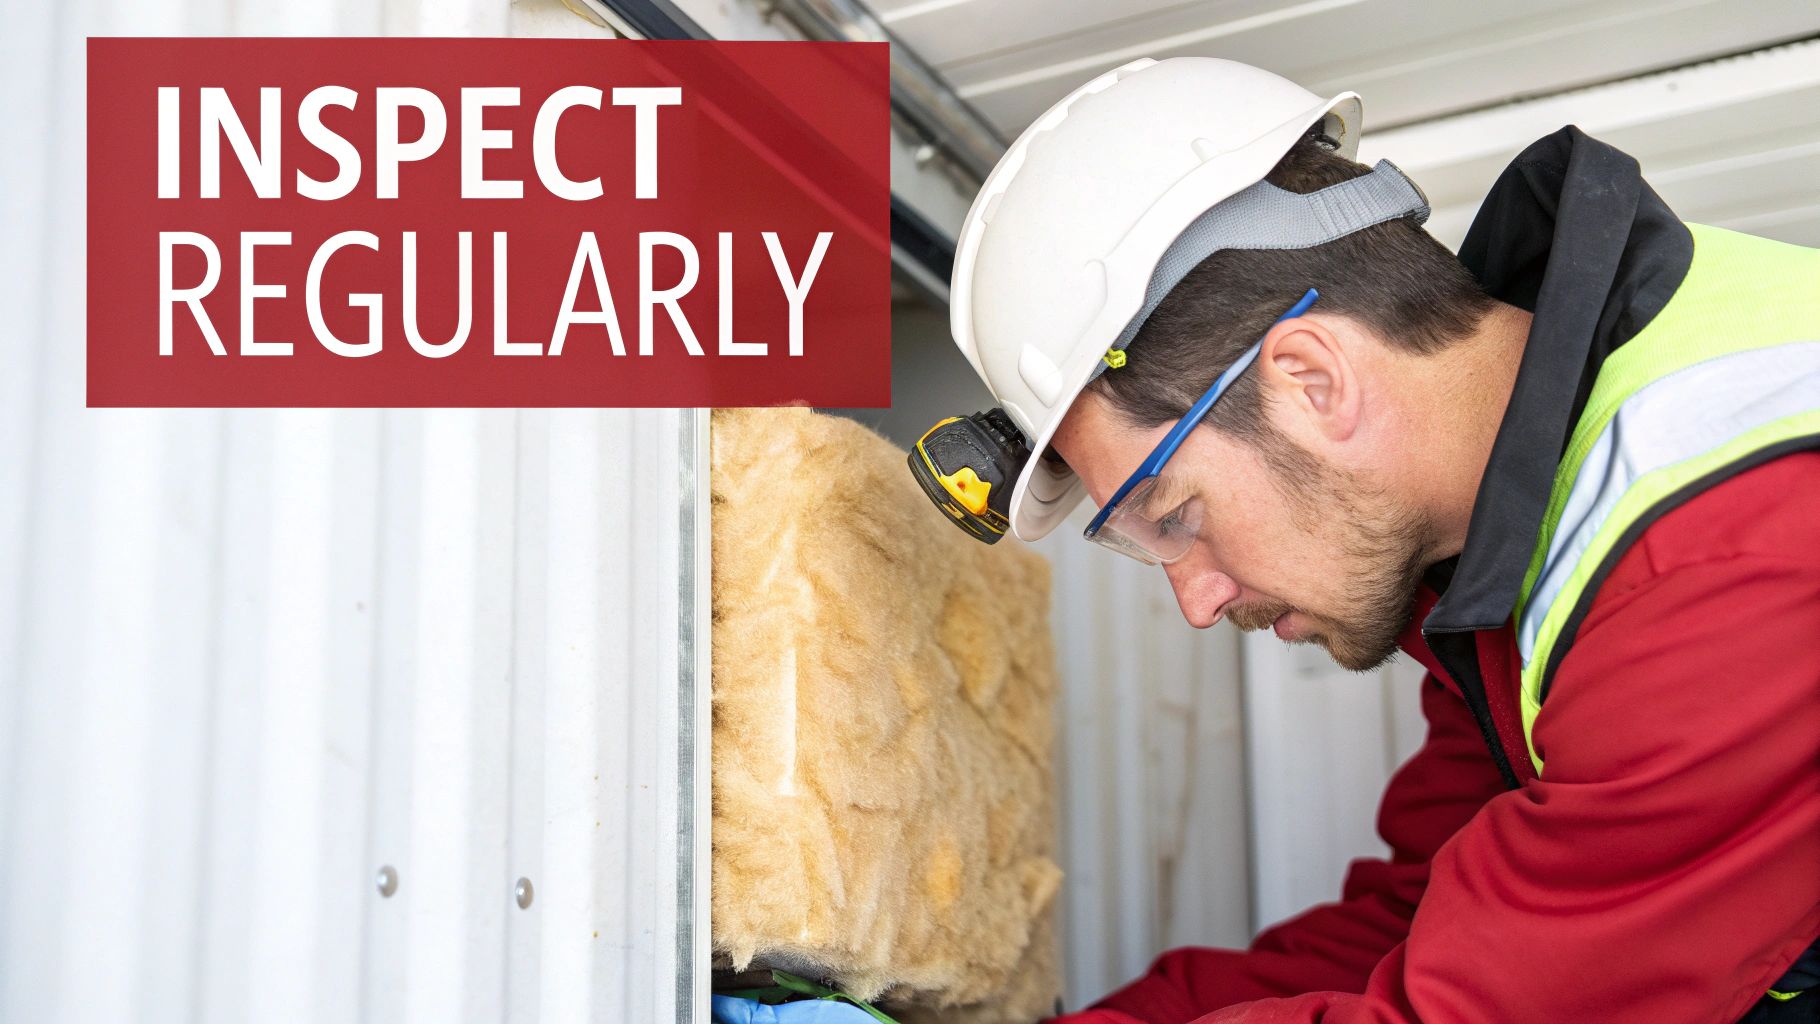
- Inspect and Treat Rust: Carefully check every inch of the interior walls and ceiling for rust. Attack any spots you find with a wire brush or grinder, then slap on a rust-inhibiting primer to seal the metal and stop future corrosion in its tracks.
- Seal All Gaps: Have a good look for any small holes or gaps, paying close attention to the doors and corners. You need to seal these completely with a high-quality metal sealant or caulk to create a watertight shell before you even think about framing.
Building Your Timber Frame
With the container prepped and ready, the next step is building an internal stud frame. This timber structure is brilliant because it does two vital jobs: it creates a cavity to house your insulation and gives you the fixing points you'll need for your interior walls, like plasterboard or plywood.
- Materials: Most people use 2x4 or 2x3 timber for the framing. The depth you go for will depend on how thick your chosen insulation is.
- Construction: Build a simple stud wall frame for each of the container's long walls, the end wall, and the ceiling. You can either build these frames flat on the floor and then lift them into place, or you can build them in situ.
- Securing the Frame: This is a crucial point: try to avoid drilling directly into the container walls wherever you can. Every hole is a potential rust spot. Instead, use a strong construction adhesive to glue the timber frame to the floor and ceiling, then secure it by running fixings between the frame and the container's existing plywood floor.
Fitting Your Chosen Insulation
Once your frame is solid, it's time for the main event: fitting the insulation. The method changes a bit depending on what material you've gone with.
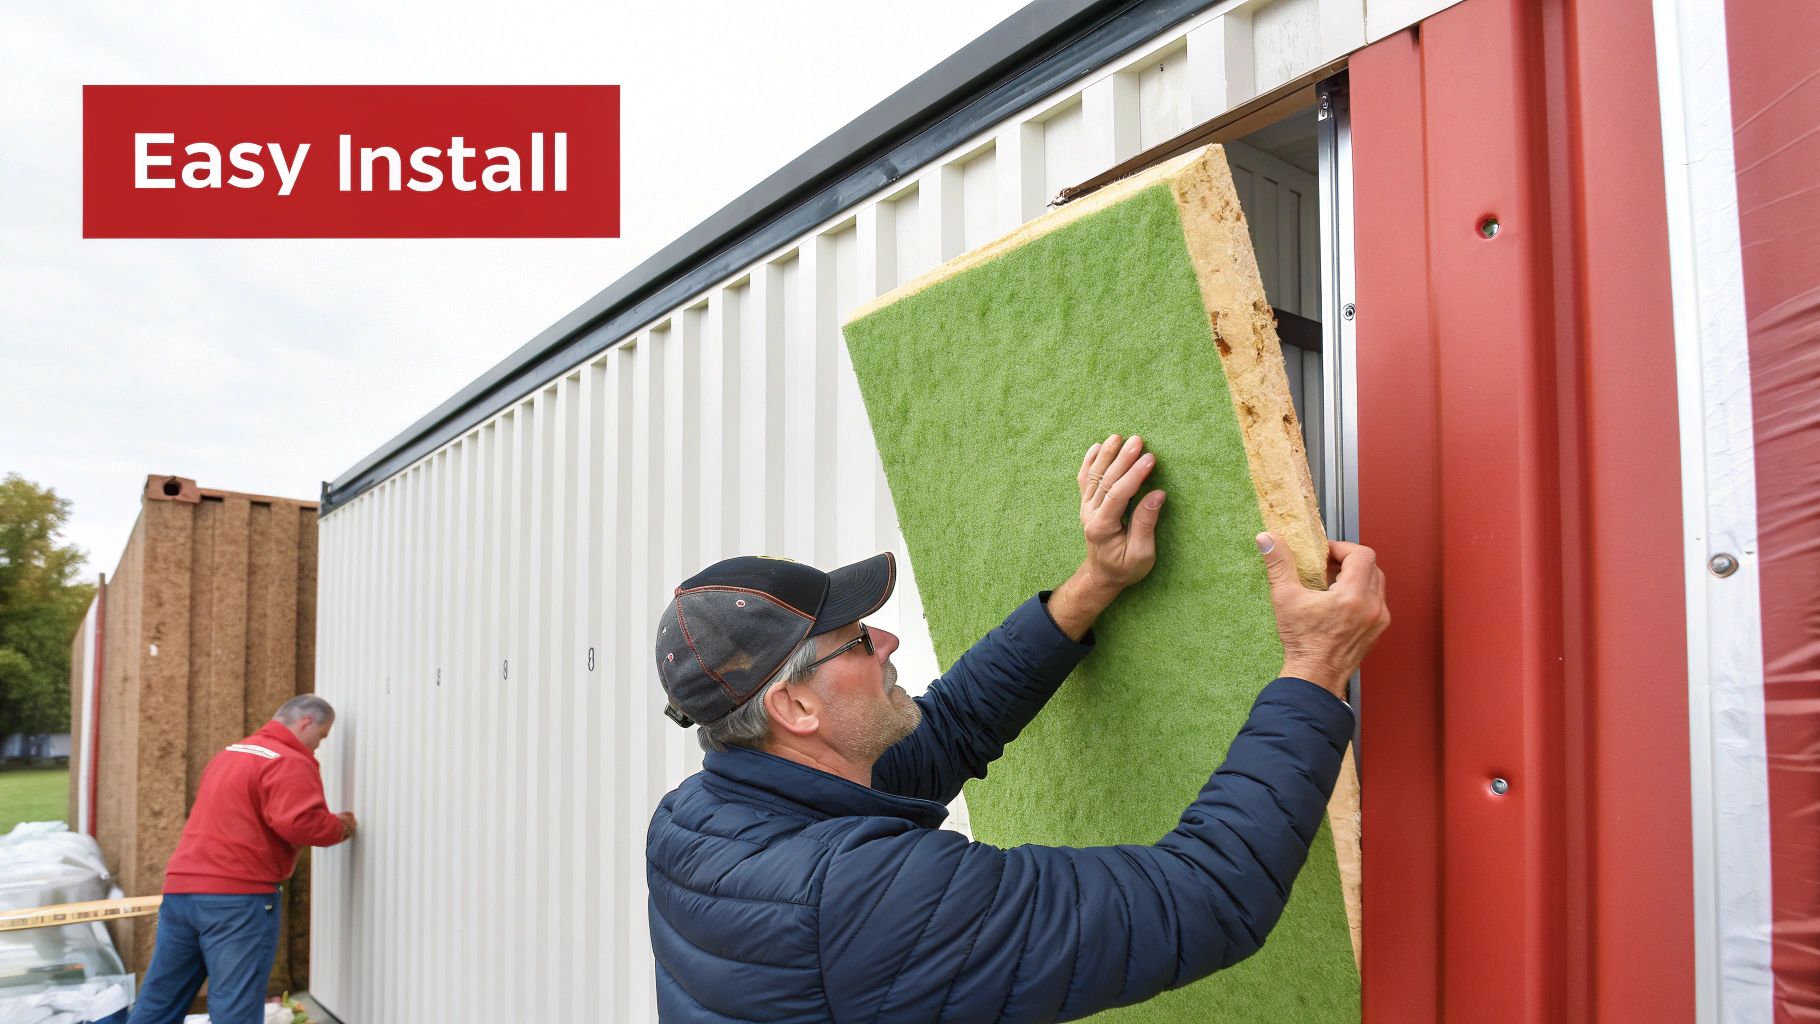
For rigid foam boards (PIR/EPS), it’s all about precision. Measure each cavity in your timber frame and cut the boards for a really snug fit. Any gaps will create thermal bridges and undermine your hard work, so be sure to seal all the joints between boards and around the frame with expanding foam or a specialised airtight tape.
For blanket insulation (mineral wool), it's a bit more straightforward. Simply cut the rolls to the right length and gently press them into the stud cavities. Make sure they fill the space completely but aren't squashed in too tightly, as over-compressing can reduce their effectiveness.
Important Reminder: If you're using blanket insulation, your vapour barrier installation (which we'll cover next) has to be absolutely flawless. Any breach can let moisture get into the insulation, rendering it useless and encouraging rust to form on your container walls.
Installing The Vapour Barrier and Finishing Walls
After the insulation is neatly tucked in, the next critical layer is the vapour barrier. This thin but mighty membrane gets installed on the warm side of the insulation (that's the interior side) and is essential for stopping moisture from your living space from reaching the cold steel walls.
Drape the polythene sheeting over your timber frame, making sure you have a generous overlap of at least 150mm at every seam. Use a high-quality airtight tape to seal every single join, staple point, and edge. You need to be extra meticulous when sealing around any window and door openings.
The UK's focus on energy efficiency is clear, with a government scheme reporting that over 54% of energy-saving measures installed by early 2025 were insulation-related. This national drive, which has resulted in an estimated £138.5 million in annual bill savings, underscores the value of thermal performance in all structures, including container conversions. For more details on these energy initiatives, you can read the full government report on household energy efficiency.
With the vapour barrier securely in place, you can finally put up your interior walls. Materials like plywood or plasterboard can be screwed directly onto your timber framing. Once the walls are up, you can start thinking about the fun stuff, like adding fixtures and planning out your storage. For some clever ideas on how to make the most of your new space, check out our guide on shipping container shelving to maximise space.
Budgeting for Your Insulation Project in the UK
When you're mapping out the budget for your shipping container insulation in the UK, it's easy to focus on the price of the insulation itself. But a realistic financial plan has to look bigger, covering all the extra costs that take a container from a bare metal box to a properly insulated space.
These often-forgotten expenses can pile up fast. You’ll need to account for the timber for the internal framing, a good quality vapour barrier, and all the fixings like screws and specialist airtight tape. And if you're not going down the DIY route, professional labour will be a hefty chunk of your total spend.
Estimating Costs Per Square Metre
To get a clearer idea of the numbers, it helps to think in terms of cost per square metre (£/m²). This can vary massively depending on the materials and method you choose.
- DIY Insulation Panels: If you're tackling the job yourself with rigid foam boards (like PIR or EPS), you could be looking at £25 to £40 per square metre. This ballpark figure includes the boards, timber framing, vapour barrier, and fixings.
- Professional Spray Foam: For a top-tier finish, professionally applied closed-cell spray foam is the gold standard. It's the most expensive option but also the highest performing. You should budget for £50 to £75+ per square metre, which covers the complete installation by a specialist crew.
Key Takeaway: The total cost of your shipping container insulation is tied directly to what you plan to use the container for. A simple workshop will have a completely different budget from a fully habitable home that needs to meet strict UK Building Regulations.
The Impact of Intended Use
What you’re going to do with your container is the single biggest factor driving the final cost. A basic storage unit might only need a simple setup to stop condensation, keeping your spending at the lower end of the scale.
On the other hand, turning a container into a home office, garden room, or living space is a whole different ball game. These projects demand high-performance insulation to hit the R-values needed for comfort and legal compliance, pushing your budget towards the top end of the estimates. Of course, a solid foundation is essential for any structure, something you can learn more about in our guide on how to level a shipping container.
This investment reflects a bigger picture. The global thermal insulation market, which covers projects like container conversions, is set to grow significantly, showing a rising demand for temperature-controlled spaces across key UK sectors. You can dig into these market trends in this detailed industry report. Getting your budget right from the start means you can avoid nasty financial surprises and make sure your project is a success.
Frequently Asked Questions
When it comes to shipping container insulation, it's natural for a few questions to pop up. Let's tackle some of the most common ones we hear from people around the UK, so you can get your project sorted with confidence.
Can I Insulate A Shipping Container From The Outside?
Absolutely. Insulating from the outside is a brilliant method, though you don't see it as often on DIY projects. The process involves wrapping the container's exterior, typically with rigid foam boards and then adding cladding to protect it.
The biggest win? You don't sacrifice a single inch of precious interior space. It also creates a complete thermal break, keeping the cold steel entirely separate from your cosy inside environment—a massive plus for stopping thermal bridging and condensation. The trade-off is that it’s a bigger, more complex job and usually costs more than insulating from the inside.
What Is The Best Insulation For Preventing Condensation?
If condensation is your number one enemy, closed-cell spray foam is the champion. It’s applied directly to the metal, forming a completely seamless, airtight, and moisture-proof barrier.
Think of it as a second skin for your container. Because it does the job of both insulation and a vapour barrier in one go, it physically stops warm, damp air from ever meeting the cold steel surface. No contact, no condensation. It’s as simple as that.
Do I Need Planning Permission To Insulate And Convert A Container?
This is a classic "it depends" situation. If you’re just using the container for something straightforward within your property, like a garden shed for storage, you probably won't need planning permission.
But the game changes the moment you convert it into a habitable space. A home office, a garden room, a workshop you'll spend hours in, or an annexe will almost certainly need planning permission. More importantly, it will have to meet UK Building Regulations for insulation, fire safety, and other services. Our best advice? Always have a chat with your local council before you start any work.
How Much Does It Cost To Professionally Insulate A 20ft Container?
The price tag can swing quite a bit, depending on what you're using the container for.
For a basic workshop where the main goal is just good condensation control, you could be looking at a budget of around £1,800 to £2,500 for a professional spray foam application. If you’re building a high-spec home office that has to meet strict Building Regulations, you'll need thicker insulation and more detailed finishing work. For a project like that, the cost could easily climb to £3,000 to £5,000+.
For all the essential components to customise and secure your container, from ventilation to shelving, visit Quickfit Container Accessories. Explore our extensive online catalogue for reliable, high-quality parts with next-day UK delivery available. Find what you need at https://www.quickfitcontaineraccessories.co.uk.