Website Orders To Northern Ireland & Republic Of Ireland and USA Now Available!


How to Insulate Shipping Containers | UK Guide & Tips
Properly insulating a shipping container is what truly transforms it from a simple steel box into a comfortable, functional space. The whole process really boils down to choosing the right materials, prepping the container’s surfaces, and correctly installing the insulation and a vapour barrier. Get that right, and you'll have perfect control over temperature and moisture, creating a durable, energy-efficient environment for any UK project.
Why Insulating Your Container Is Essential in the UK
Before we jump into the "how-to," it’s crucial to understand why insulating a shipping container is completely non-negotiable for any UK-based project. A bare steel shell is incredibly vulnerable to our notoriously changeable climate. Without a thermal barrier, it's just a metal box left out in the elements—sweltering in the summer and absolutely freezing in the winter.
This vulnerability causes some major headaches beyond just uncomfortable temperatures. The real enemy here is condensation. It forms when the warm, moist air inside hits those cold steel walls, quickly leading to dampness, mould, and eventually rust that can eat away at the container's structure.
Battling Condensation and Thermal Bridging
Just sticking a heater inside an uninsulated container is a losing battle. The steel walls create a massive thermal bridge, basically sucking the heat straight out of the space. You'll pour money into energy bills trying to keep it at a steady temperature, all while fighting a constant battle with moisture.
Effective insulation creates a complete break in this thermal bridge. It’s a simple concept: keep the warm air inside from ever touching the cold steel, which stops condensation before it can even start.
Key Takeaway: Insulation isn't just about warmth; it's your primary defence against condensation, rust, and sky-high energy bills. It fundamentally changes the container from a simple box to a durable, habitable structure.
Meeting UK Standards and Maximising Comfort
For UK projects, insulation often moves from a practical must-have to a legal requirement, especially if the container is intended for habitation. Building regulations demand specific thermal performance levels (known as U-values) to ensure energy efficiency and safety. In a typical 20-foot container, proper insulation can slash energy bills by up to 30% by cutting down heat loss—a game-changer during UK winters.
Understanding the need for thermal protection is crucial for any space in the UK, much like when you're figuring out how to winterize a boat for the UK climate. By properly insulating your container, you’re creating a space that’s not only comfortable and energy-efficient but also compliant and built to last.
Comparing Insulation Materials for Your UK Project
Not all insulation is created equal, especially when you’re wrestling with the unique challenges of a steel shipping container. Getting the right material for your UK-based project is a careful balancing act between performance, budget, and just how much of that precious interior space you’re willing to give up.
Let’s be honest, nobody wants a damp, freezing container. So, let's break down the most popular options to help you make the right call.
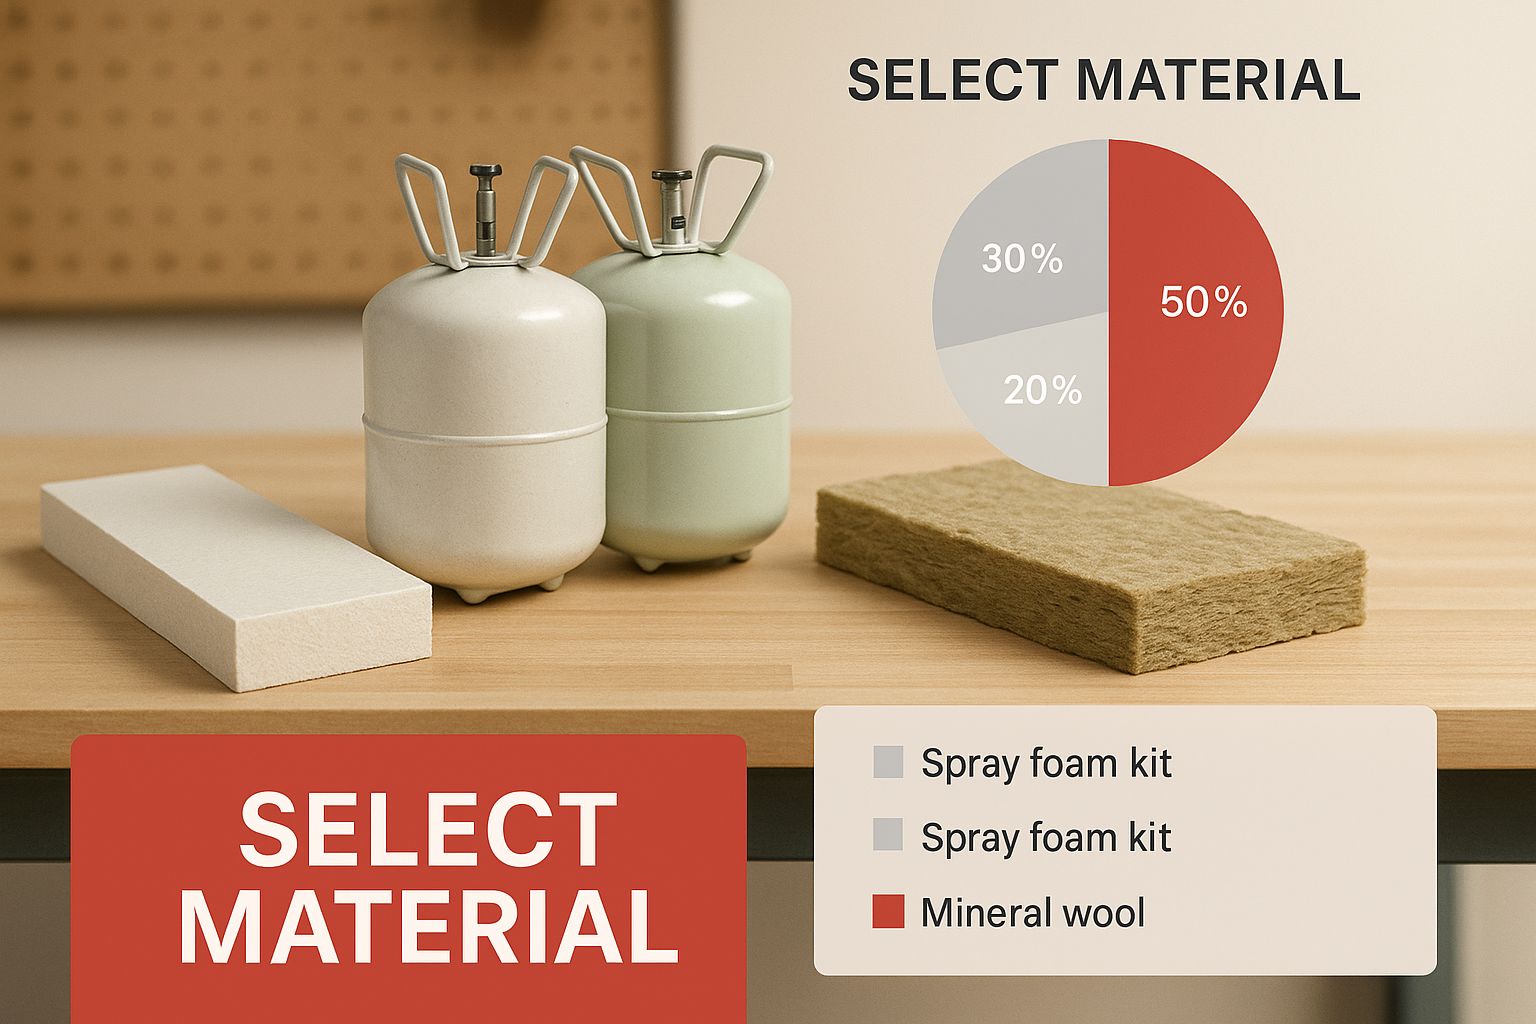
As you can see, while spray foam gives you that unbeatable airtight seal, rigid boards offer a fantastic sweet spot between performance and DIY-friendliness.
UK Shipping Container Insulation Comparison
Choosing the right insulation can feel like a minefield. To make it a bit simpler, here’s a side-by-side look at the most common materials we see used in UK container conversions. This table breaks down what you can expect in terms of cost, performance, and the realities of working with each one.
| Insulation Type | Typical Cost (£/m²) | Pros | Cons |
|---|---|---|---|
| Closed-Cell Spray Foam | £15 - £50+ | Unbeatable airtightness; excellent vapour barrier; fills every gap. | Higher cost; requires professional installation; permanent. |
| Rigid Foam Boards (PIR/XPS) | £10 - £30 | Great thermal performance for its thickness; DIY-friendly; moisture-resistant. | Joints must be meticulously taped; can be more expensive than blankets. |
| Insulation Blankets (Mineral Wool) | £5 - £15 | Most budget-friendly; excellent acoustic dampening; non-combustible. | Requires a separate, perfectly installed vapour barrier; loses all R-value if it gets damp. |
After weighing the pros and cons, the best choice really boils down to your specific project. For a high-spec living space, spray foam is hard to beat. For a workshop or storage unit, rigid boards or even well-protected mineral wool can be more than enough.
Spray Foam Insulation: The Airtight Champion
If you're after the best of the best, spray foam is where it's at. Specifically, closed-cell polyurethane foam is widely seen as the gold standard for container projects. When a professional applies it, the foam expands to fill every single nook, cranny, and corrugation. The result? A completely seamless and airtight thermal barrier.
This is spray foam's superpower. It completely stops air leakage and acts as a brilliant vapour barrier, putting a full stop to condensation before it can even start.
Of course, this top-tier performance doesn't come cheap. For a typical 50 mm layer of closed-cell foam in the UK—which is highly effective at keeping internal temperatures stable—you could be looking at a starting price of around £15 per square metre for a basic anti-condensation coat. If you need to meet UK Building Regulations for a habitable space, that figure can climb to over £50 per square metre.
Rigid Foam Boards: A Practical All-Rounder
Rigid foam insulation boards, like Polyisocyanurate (PIR) or Extruded Polystyrene (XPS), are an excellent and hugely popular alternative. They pack a serious punch in terms of thermal performance (a high R-value) for their thickness, which means you get great insulation without sacrificing too much of your interior living space.
Their biggest wins include:
- DIY-Friendly: The boards are pretty easy to cut and fit, making them a fantastic choice if you’re happy to get your hands dirty.
- Space Saving: Because they're so thermally efficient, you can often use thinner boards compared to materials like wool, which is a real bonus in a tight space.
- Moisture Resistance: PIR and XPS are both closed-cell foams, so they won’t soak up water and can even serve as a partial vapour barrier on their own.
The real challenge with rigid boards is dealing with the seams. You absolutely have to be meticulous about taping every single joint with high-quality foil tape. If you don't, you’ll create thermal bridges and give moisture a way in, undoing all your hard work.
Insulation Blankets: The Budget-Friendly Choice
If budget is your main driver, then insulation blankets or batts are a very viable option. These are usually made from mineral wool (often called rock wool) or sometimes sheep’s wool. They are generally the most cost-effective choice and come with the added benefit of excellent acoustic dampening—your container will be a lot quieter. Plus, mineral wool is non-combustible, which is a big tick in the fire safety box.
Expert Tip: While mineral wool is a great insulator for the price, it must be paired with a separate, perfectly installed vapour barrier. Unlike closed-cell foams, wool loses all its insulating power if it gets damp, which is a huge risk in a steel box without bulletproof moisture management.
Ultimately, the right choice really hinges on your priorities. For flawless performance and moisture control, spray foam is king. For a balanced, hands-on approach, rigid foam boards are a brilliant solution. You can find more practical advice in our detailed look at shipping container insulation techniques.
Preparing Your Container for a Flawless Finish
Proper preparation is the absolute bedrock of a successful insulation job. It’s tempting to rush this stage, but that’s a false economy. Rushing now leads to rust, mould, and poor thermal performance later on, completely undermining all your hard work.
Think of it as laying the foundations for a house—get this part right, and everything else will stand strong for years to come.
The first, non-negotiable job is a deep clean. Shipping containers have a tough life, and their interiors are often coated with industrial residues and harsh cleaning chemicals. You definitely don’t want those sealed inside your walls. A thorough wash with a strong degreaser and a pressure washer is essential to create a pristine surface for primers and adhesives to really grip onto.
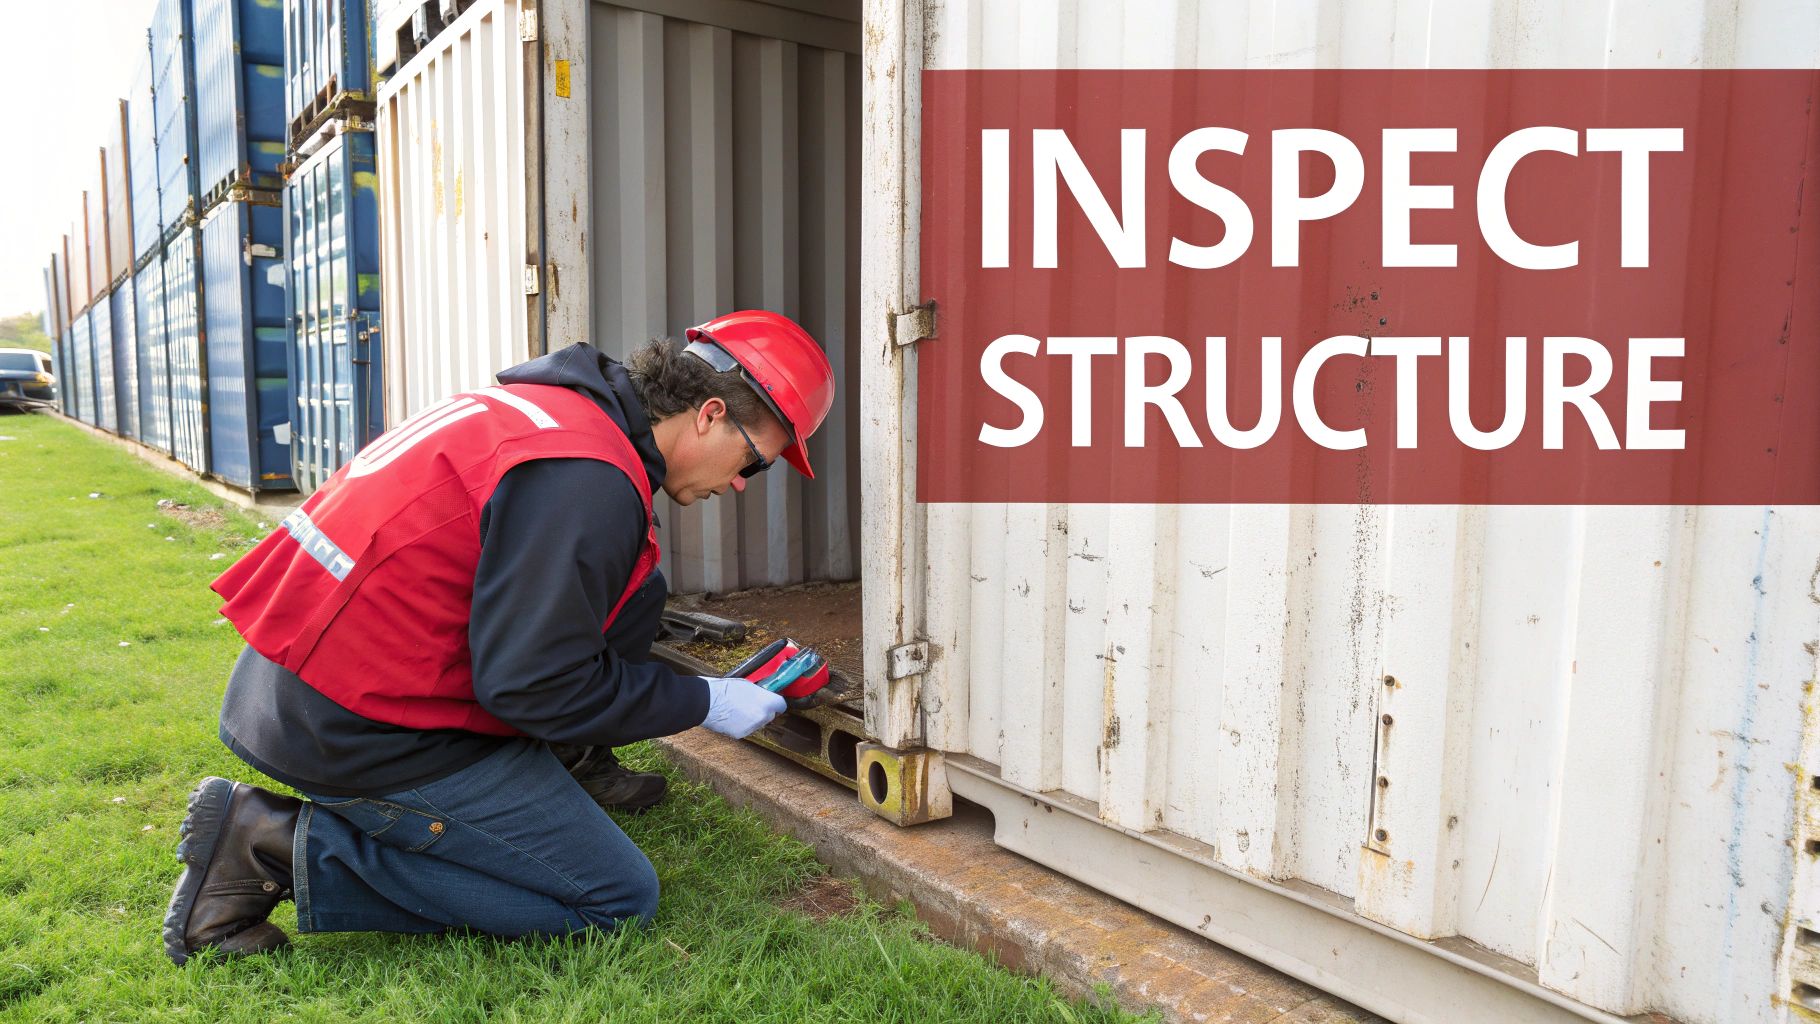
Inspecting and Repairing Damage
Once the container is sparkling clean, it’s time to play detective. Get in there and carry out a detailed inspection. Pay close attention to any dents, holes, and especially any patches of rust. Even tiny spots of corrosion can spread like wildfire once they’re sealed behind insulation and a vapour barrier.
If you find any rust, you need to deal with it immediately and properly:
- Grind It Back: Use a wire wheel on an angle grinder to get rid of all visible rust. You want to take the area right back to bare, shiny metal.
- Treat and Prime: Apply a rust converter or a direct-to-metal, rust-inhibiting primer to all the repaired patches. This neutralises any lingering microscopic corrosion and seals the steel from moisture.
- Fill Any Holes: Small holes can be patched up with steel plates and a strong sealant. For a permanent, bulletproof fix, welding is the way to go.
Before you even think about moving on, the container must be bone dry. Any trapped moisture is a future condensation nightmare just waiting to happen. Use fans or even a dehumidifier to make sure every last nook and cranny is completely arid. This is also the perfect time to ensure your base is solid; you can learn more about this in our guide on how to level a shipping container.
Expert Insight: Don't just paint over rust. It might look fixed, but it will continue to fester underneath the paint, quietly compromising the structural integrity of your container over time. Proper removal and treatment are non-negotiable for a durable conversion.
Planning for Wiring and Plumbing
Here’s one of the most common mistakes I see: people insulate first and only think about the wiring and plumbing later. This is a massive headache. Running services after the fact means cutting into your beautifully sealed insulation and vapour barrier, which creates thermal bridges and potential moisture leaks.
The smart move is to plan and install all your wiring conduits and plumbing pipes before any insulation goes in.
By installing your studwork first, you create a perfect service cavity between the container wall and your interior cladding. This lets you run all your wiring and plumbing without ever disturbing the insulation barrier. Beyond just the materials, a flawless finish means creating a tight seal using specialised airtightness products. This kind of forward planning is what separates an amateur job from a professional, long-lasting build.
Putting It All Together: Your Guide to a Flawless Installation
This is where the theory meets reality. You've got your prepped container and your chosen materials, so it's time to roll up your sleeves. The goal here is a snug, gap-free fit that creates a continuous thermal barrier, protecting your container home or office from the notoriously damp UK climate.
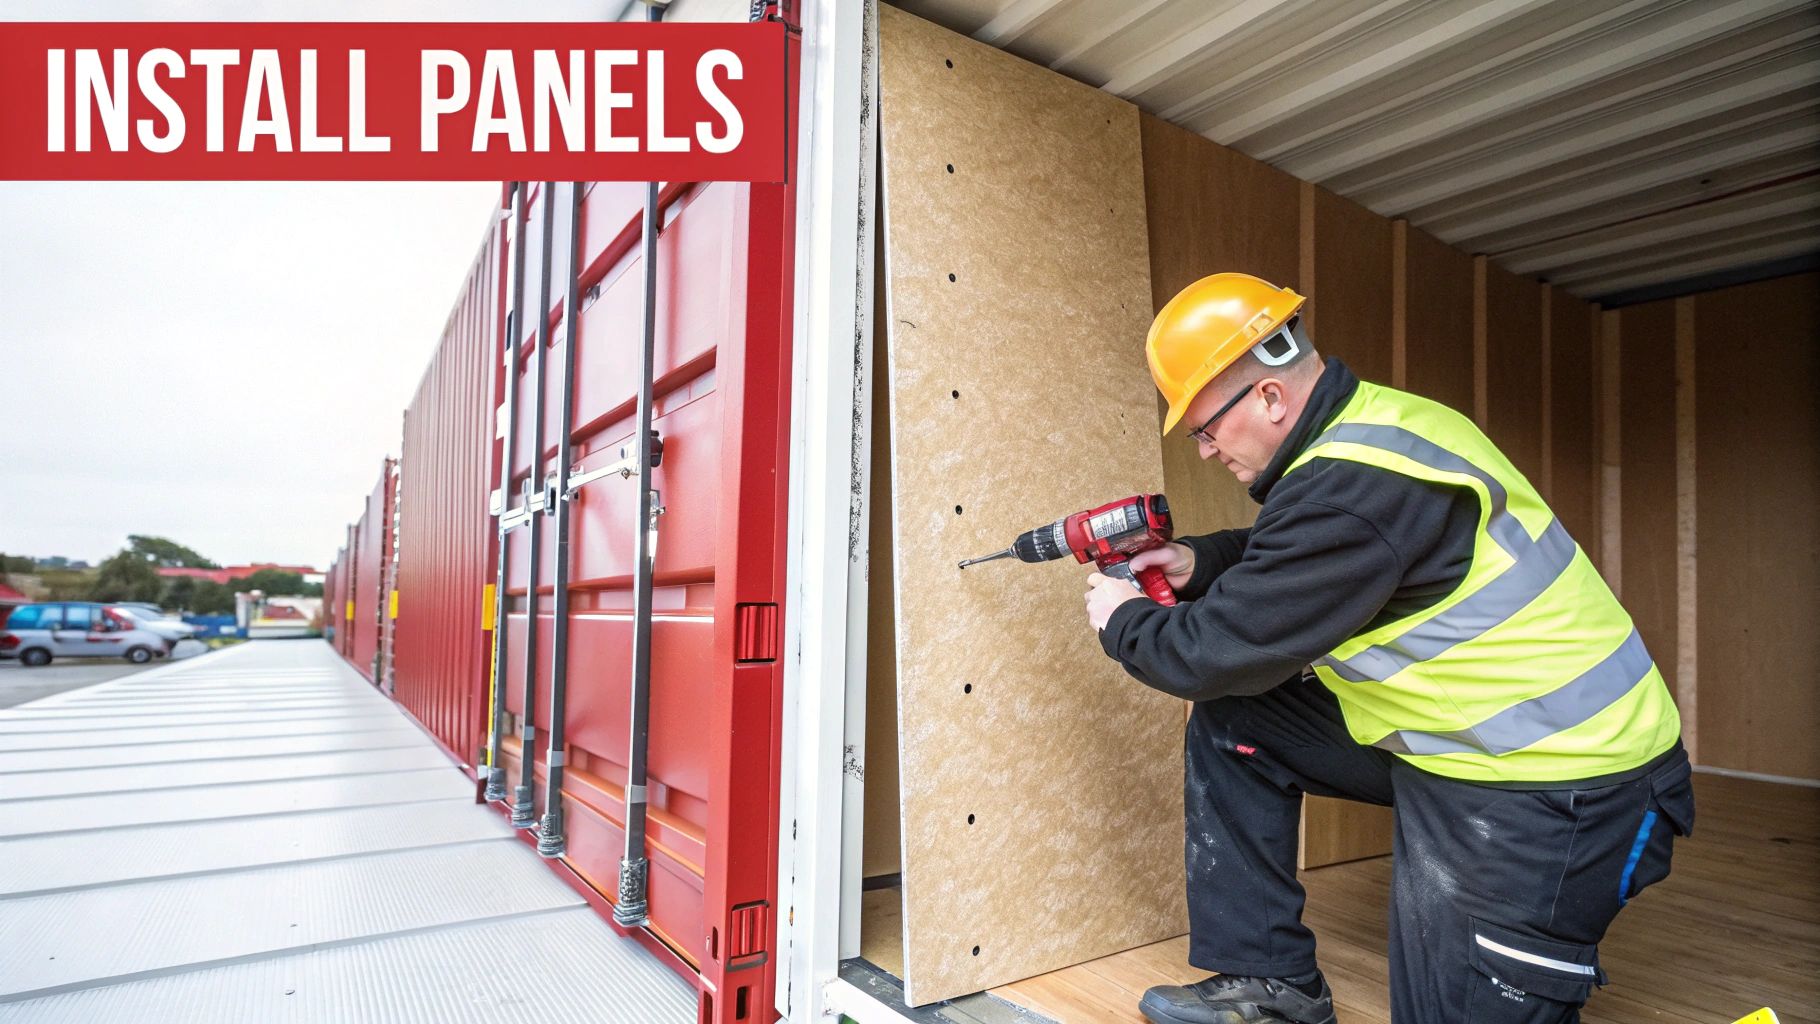
No matter if you’ve gone with rigid boards, spray foam, or insulation blankets, the first real step for most internal jobs is building a stud frame. This framework, usually made from timber or lightweight steel, is what you’ll eventually fix your interior walls to, like plasterboard or plywood.
The frame does two important things. First, it gives you a perfectly flat interior surface, neatly hiding the wavy container walls. Second, it creates the all-important cavity where your insulation will sit. A key tip is to set the frame just inside the innermost ripple of the corrugations—this lets you squeeze out every last centimetre of interior space.
How to Install Different Insulation Materials
Of course, the exact method depends entirely on what material you're working with. Each one has its own quirks, and getting them right is crucial for a good result.
-
For Rigid Foam Boards (PIR/XPS): This is a really popular route for DIYers. The job involves cutting the boards to fit tightly within your stud frame. I've found a combination of construction adhesive and a few mechanical fixings gives the most secure fit. The absolute most critical step? Taping every single seam with high-quality foil tape. This creates a complete vapour seal and stops thermal bridging in its tracks.
-
For Insulation Blankets (Mineral Wool): Installing these is pretty straightforward—you just cut the blankets to the right size and press-fit them into the stud frame cavities. They’re designed to stay in place with friction alone. But the one thing you absolutely cannot skip is adding a separate, perfectly sealed vapour barrier membrane over the entire frame afterwards.
-
For Spray Foam: This is definitely a job for the professionals. They'll come in and spray the foam directly onto the container's interior walls. It expands instantly, filling every tiny gap and creating one solid, airtight layer. Your stud frame can be built either before or after they spray, depending on the specific system they use.
Expert Tip: When you're cutting rigid boards to fit against the corrugated walls, make a cardboard template first. Trace the corrugated profile onto the cardboard, cut it out, and check the fit. Once it’s perfect, use that template to guide your cuts on the insulation boards. You'll get a flawless, gap-free result every time.
Why Insulation Thickness Matters
When you're figuring out how to insulate a shipping container, the thickness of your material plays a massive part in how well it performs. Research on thermal design shows that adding just 2.5 cm of insulation can slash heat transfer by around 37%. If you double that to a 5 cm thickness, you get an even better 40% reduction.
For most projects here in the UK, I'd suggest aiming for at least 5 cm of high-performance insulation. It’s a great benchmark that balances thermal comfort and energy savings without sacrificing too much precious interior space. You can dive into the full findings on insulation thickness and thermal performance if you want to get into the nitty-gritty.
Ultimately, a successful installation comes down to precision and paying attention to the small stuff. Rushing the job or cutting corners—especially when sealing gaps and fitting vapour barriers—will undermine the entire system. It’ll leave your container vulnerable to the very damp and condensation issues you're working so hard to prevent.
Right, with your insulation all snug and fitted, you might be tempted to think the hard work is over. But honestly, these next few steps are what will make or break your container project. Skipping the finishing touches is a classic mistake that I’ve seen compromise all that effort you’ve just put in.
The next layer you need to get right is the vapour barrier. In any container conversion here in the UK, this is absolutely non-negotiable. Its entire job is to stop the warm, damp air we create inside—just from breathing, cooking, or having a shower—from hitting that cold steel shell. If it does, you'll get condensation, which quickly leads to damp, mould, and eventually, rust.
Installing Your Vapour Barrier and Cladding
Imagine the vapour barrier as a perfectly sealed envelope tucked inside your stud frame. It always goes on the 'warm' side of the insulation, which means it sits right between the insulation and whatever you choose for your interior walls.
Getting this right is all about precision. Here’s what you need to nail:
- Complete Coverage: The barrier, which is usually a polythene membrane, has to cover every single surface—walls and ceiling—with absolutely no gaps.
- Generous Overlaps: Don't be shy with the overlaps. Aim for at least 150mm on every seam.
- Seal Every Single Joint: This is no place to cut corners. Use a high-quality, specialised vapour barrier tape to seal up all those overlaps, joints, and any accidental nicks from screws or wires. Standard duct tape just won't cut it; it will dry out and fail over time, I promise you.
Once that vapour barrier is sealed up tight, you can finally move on to your interior cladding. This is the bit you'll actually see and touch, and your choice here really sets the tone for the entire space. You could go for plasterboard for a traditional, room-like feel, or choose something like plywood or OSB for a tougher, more industrial vibe.
Expert Tip: When you’re fixing your cladding panels to the frame, choose screws that are just long enough to get a good grip on the timber. If they’re too long, you risk piercing that pristine vapour barrier and insulation you just installed. That creates a tiny, direct bridge for cold and moisture to sneak right in.
Creating a Habitable and Functional Space
With your cladding panels carefully fixed to the timber or metal stud frame, the main construction work is pretty much done. Be mindful not to damage that vapour barrier as you go. With the walls up, the space starts to feel less like a container and more like a proper room.
Now the fun part begins: planning the fit-out. This is where you can start thinking about fixtures and fittings. In a compact space like a container, smart storage is absolutely essential. We’ve put together a whole guide on this, which you can read for some great ideas on shipping container shelving and smart storage solutions.
From this point, it’s all about the finishing touches—priming, painting, and installing your flooring, lights, and sockets. By paying close attention to these final details, you're ensuring all that hard work insulating pays off. You’ll be left with a dry, warm, and comfortable space that’s truly built to last.
Common Container Insulation Questions Answered
Even with the best-laid plans, a few questions always seem to surface during a container insulation project. Getting the right answers can be the difference between a job well done and a costly mistake. Let's tackle some of the most common queries we get from people figuring out how to insulate their shipping container.
One of the first things people want to know is if they can just insulate the container from the outside.
Yes, you absolutely can, and external insulation is a fantastic method, though you don’t see it as often on DIY builds. The process involves cladding the exterior with insulation and then adding a weatherproof finish. The huge plus here is that you don't sacrifice any of that precious internal space, which is a major win in a compact container home or office. The trade-off? It's typically more expensive and complex, often needing a professional touch to make sure it’s completely sealed against the lovely UK weather.
Meeting Regulations and Getting a Smooth Finish
Another question that comes up a lot is about the minimum insulation needed to meet UK building regulations.
Honestly, this one really depends on what you’re using the container for. The requirements for a habitable room are completely different from those for a simple workshop or storage space. For a dwelling, you’ll need to hit the specific U-values laid out in the current UK Building Regulations, which often means using 75-100mm of a high-performance rigid foam like PIR. It's always best to chat with a building control officer or an architect to get your plans signed off before you even think about starting.
And finally, the big one: how do you get a perfectly smooth interior wall over those iconic corrugated steel panels?
The go-to method is to build an interior stud frame using timber or light-gauge steel. This frame is built just inside the innermost point of the wall corrugations, which cleverly creates a service cavity for your insulation and any wiring. Once the frame is up, you can fix your interior panels, like plasterboard or plywood, directly onto it for a flat, professional finish.
This technique is pretty much fundamental to most container conversions. It's not just about getting a smooth surface; it's also a critical part of managing moisture. Getting moisture control right is key, and you can get the full rundown in our guide on how to reduce condensation in shipping containers. By combining a stud frame with the right insulation and a vapour barrier, you create a solid system that will keep your space warm, dry, and comfortable for years to come.
For all your container conversion needs, from high-security lockboxes to shelving and ventilation, Quickfit Container Accessories offers a massive range of parts with next-day UK delivery. Find everything you need to get the job done right at https://www.quickfitcontaineraccessories.co.uk.