Website Orders To Northern Ireland & Republic Of Ireland Now Available!


Cladding a Shipping Container: a UK Guide to Materials and Costs
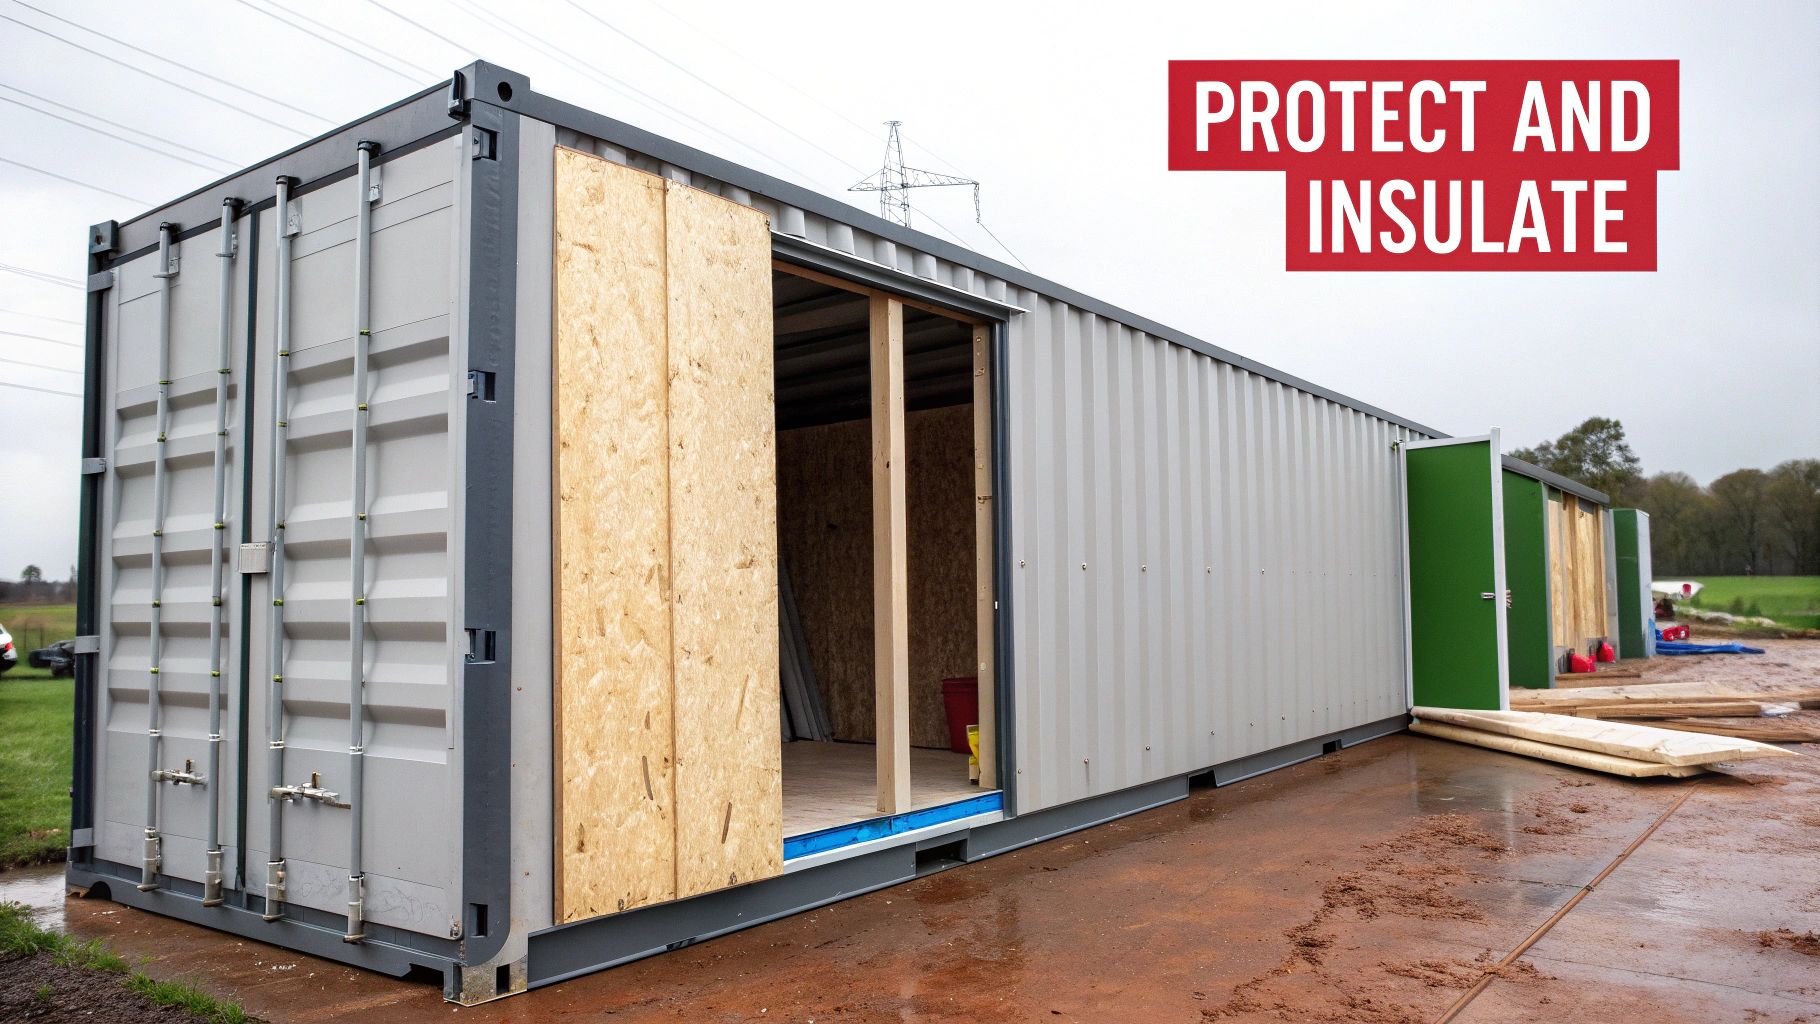
Cladding a shipping container means adding an external layer of material to its walls. This process does more than just transform its industrial look; it’s a massive upgrade in performance. This new outer skin protects the original steel from rust, creates a vital cavity for insulation, and gives you total freedom to customise the look.
Why Cladding Is a Game-Changer for UK Container Projects
Think of shipping container cladding as a high-performance jacket for a tough, industrial box. A standard container is built to survive life at sea, but that doesn't mean it's ready for long-term use as a home or office—especially not in the UK's notoriously damp climate.
Cladding provides that essential outer layer, protecting the container from the elements, keeping it warm, and making it look fantastic. It's much more than a cosmetic upgrade; it’s a critical part of proper weatherproofing and thermal performance, and it's key to ensuring your project meets UK building standards.
Before we dive into the details, here's a quick look at why cladding is such a smart move for any container project.
Key Benefits of Cladding Your Shipping Container
| Benefit | Impact on Your Container Project |
|---|---|
| Weather Protection | Acts as a rain-screen, preventing rust and dramatically extending the container's lifespan. |
| Thermal Performance | Creates a cavity for insulation, keeping the interior warmer in winter and cooler in summer. |
| Acoustic Insulation | Dampens noise from rain and wind, creating a much quieter and more comfortable space inside. |
| Aesthetic Transformation | Allows you to completely change the look, helping it blend in or stand out as needed. |
| Meeting Regulations | Often essential for satisfying local planning requirements and building control standards. |
As you can see, cladding solves some of the biggest challenges that come with converting a steel box into a liveable or workable space.
Protecting Your Investment from the British Weather
The main job of cladding is to shield the container’s Corten steel from relentless wind and rain. A well-designed system, complete with a ventilated air gap, acts as a rain-screen. This stops moisture from sitting against the steel and causing corrosion.
Getting this right is fundamental to stopping rust in its tracks and massively extending the container's lifespan, making it a wise investment for any serious project.
The demand for this kind of customisation is soaring. The UK shipping container market is booming, part of a global industry valued at £6.6 billion in 2025. With domestic growth projected at 2.1% annually through 2035, the need for high-quality cladding solutions is only going to grow as more people get creative with these steel boxes.
A container's worst enemy in the UK is trapped moisture. Cladding doesn't just make it look better; it creates a breathable, protective barrier that is the single most effective way to prevent the condensation and corrosion that plague unmodified steel boxes.
Boosting Thermal and Acoustic Performance
One of the biggest wins from cladding a shipping container is the huge improvement in thermal efficiency. The framework you build to attach the cladding creates the perfect cavity for high-performance insulation.
- Better Heat Retention: By filling this space with insulation, you can drastically cut down on heat loss, which is essential for keeping energy bills under control. Your container will stay warmer in winter and cooler in summer, simple as that.
- Noise Reduction: A bare metal box can be incredibly noisy, amplifying the sound of rain and wind. Cladding, when paired with insulation, acts as a fantastic sound buffer, creating a far more peaceful and comfortable interior.
We've got a comprehensive guide on shipping container insulation that dives deep into choosing the right materials to pair with your cladding system.
Achieving a Professional Transformation
Finally, the aesthetic impact is undeniable. Cladding gives you complete creative freedom to move beyond that utilitarian, industrial look.
Whether you want to blend a container into a garden with natural timber or create a sleek, modern site office with metal panels, the possibilities are endless. This ability to personalise the exterior is often what makes the difference when it comes to satisfying local planning requirements and achieving a finish that looks polished, professional, and completely intentional.
Choosing Your Cladding Material and Planning for Success
Getting your container cladding project right starts way before you pick up a single tool. This is the blueprint phase, and honestly, it’s where the success of the whole job is decided. It’s all about mapping everything out, from giving your container a proper once-over to picking the perfect material for your budget and the look you’re after.
Nail this stage, and the rest of the project will run smoothly. You’ll sidestep those expensive mistakes and end up with a professional finish that can actually handle the unpredictable UK weather. Think of it as laying the foundations—a bit of solid planning now saves a world of headaches later on.
First Steps: Assessing Your Container
Before you start dreaming about beautiful Siberian Larch or sleek metal panels, you need to get real about what you’re starting with. Every shipping container has a story, usually involving a hard life at sea, which means giving it a thorough inspection is non-negotiable.
Get up close and have a good look. You're searching for any significant damage, not just the odd dent or scratch. Pay special attention to a few key areas:
- Rust and Corrosion: Pinpoint any rusty patches. A bit of surface rust is no big deal and can be sorted, but deep corrosion might need a professional to look at it before you even think about cladding.
- Structural Integrity: Check the corner castings and the main frame. Are there any signs of twisting or serious damage? You need to be sure the container's strength isn't compromised.
- Leaks: The best way to check for leaks is to get inside after a heavy downpour. Any water getting in has to be sorted before you seal it all up behind a new layer of cladding.
Next, get your tape measure out. You need precise measurements for the length, width, and height. Don't forget to factor in the deep corrugations on the sides, as your support frame will need to create a completely flat surface over them. Getting these numbers spot on is crucial for ordering the right amount of material and avoiding costly waste.
Selecting the Right Cladding Material for Your Project
Now for the exciting part—choosing the material that will completely transform your container. This decision dictates the final look, how much maintenance you’ll be doing down the line, and of course, the overall budget. Here in the UK, a few key options tend to be the most popular, and for good reason.
Timber cladding gives you that classic, natural look that can really soften the industrial feel of a container. It’s a brilliant choice for garden offices, home gyms, or any project in a more rural setting. When you start looking into the various timber cladding options, you'll see just how versatile it can be, from affordable treated softwoods to stunning premium hardwoods like Cedar.
Composite materials offer the aesthetic of wood but without the ongoing upkeep. They’re made from a mix of recycled wood fibres and plastics, making them incredibly durable and resistant to rot, warping, and pests. It's pretty much a 'fit and forget' solution.
For a sharp, modern or industrial vibe, metal cladding is a fantastic choice. Materials like Corten steel are designed to develop a protective rust patina over time, which looks amazing, while pre-finished aluminium panels provide a clean, crisp finish in a huge range of colours.
Your choice of material directly impacts the entire project. Heavier materials like fibre cement may require a more robust support frame than lightweight timber, influencing both the cost and complexity of the installation. Plan accordingly.
To help you weigh up the options, let's put these popular choices side-by-side.
UK Cladding Material Comparison and Cost Guide
Choosing the right material is a balance of aesthetics, budget, and how much maintenance you're willing to do. This table breaks down the most common cladding materials used in the UK to give you a clearer picture of what might work best for your container project.
| Material Type | Estimated Cost per m² (GBP) | Pros | Cons & Maintenance |
|---|---|---|---|
| Treated Softwood (Pine) | £25 - £50 | The most affordable option, widely available, and easy to paint or stain in any colour. | Requires regular re-staining or painting (every 3-5 years) to prevent rot. |
| Siberian Larch | £50 - £85 | Naturally resistant to rot and decay due to high resin content. Weathers to an attractive silver-grey. | Can be brittle and may split if not installed carefully. Needs cleaning to avoid mould. |
| Western Red Cedar | £80 - £120+ | Premium look, lightweight, and very stable. Excellent natural durability. | Higher initial cost. Can be easily dented or scratched due to its softness. |
| Composite Cladding | £60 - £100 | Extremely low maintenance, resistant to rot and insects, and available in many styles. | Higher upfront cost than softwood. Can look less natural than real timber. |
| Fibre Cement Boards | £70 - £110 | Non-combustible (great for fire safety), resistant to rot and pests, holds paint well. | Heavy and can be brittle, requiring specialised cutting tools and careful handling. |
| Metal (Corten, Aluminium) | £90 - £150+ | Extremely durable and long-lasting with a modern aesthetic. Corten is zero-maintenance. | Can be expensive and may require specialist installation for a perfect finish. |
Ultimately, the best material is the one that fits your vision, your wallet, and your willingness to get the paintbrush out in a few years' time. Consider the long-term picture, not just the initial cost.
Right, you’ve picked your materials and sketched out a plan. Now for the fun part: getting your hands dirty and installing the cladding. This is where you really start to see your project come to life, turning that corrugated steel box into something that looks polished and performs brilliantly.
This isn’t just about slapping on a few panels. Think of it as a methodical process where preparation, framework, and finishing all have to be spot on. Getting each stage right is what makes the difference between cladding that just looks good and cladding that provides proper protection for years to come.
This visual guide shows the basic flow of a cladding project, underlining how crucial a structured approach is from the very first inspection.

As the infographic suggests, a top-notch installation is always built on meticulous prep work. Don't be tempted to skip ahead before you've got the foundations right.
Preparing the Container Surface
Before a single batten goes on, that steel surface needs to be in prime condition. Trapping dirt, grease, or rust behind your new cladding is a recipe for disaster—it just allows corrosion to carry on munching away at the metal, completely unseen. This prep stage is absolutely non-negotiable for a long-lasting finish.
Kick things off with a thorough clean. A pressure washer is your best friend here, perfect for blasting away years of grime and any salty residue from the container's past life on the seas. Once it's clean and totally dry, it's time to get up close and personal with a rust inspection.
Any corrosion you find needs dealing with decisively. Grab a grinder with a wire brush attachment and take the affected spots right back to clean, bare metal. It's vital to get every last flake off.
Once you've ground it back, treat the area with a quality rust converter or inhibitor. This stuff chemically neutralises any lingering rust traces and stops it from coming back. The final job is to seal the entire container with a durable, zinc-rich metal primer. This gives you a stable, protective base for the framework that’s coming next.
Constructing a Solid Framework
You should never fix cladding panels directly onto the corrugated sides of a shipping container. Instead, you need to build a support framework first, usually from timber battens or metal rails. This framework does two incredibly important jobs.
First, it creates a perfectly flat and level surface to attach your cladding to. This is the secret to getting those sharp, professional-looking lines. Secondly, and arguably more importantly, it creates a ventilated cavity, often called a rain-screen gap.
This air gap, typically between 25mm and 50mm, is the single most important part of managing moisture. It lets air circulate behind the cladding, which means any condensation that inevitably forms on the cold steel can evaporate and escape. Without this gap, moisture gets trapped, leading to damp, mould, and eventually the very corrosion you’re trying to prevent.
The framework itself is usually built from pressure-treated softwood battens fixed vertically to the container. The main thing is to ensure they are securely attached and perfectly aligned. A wonky frame will always lead to a wonky finish.
Pro Tip: Make absolutely sure your container is perfectly level before you even think about starting the frame. Even a slight tilt can throw all your measurements out and make aligning the cladding panels a nightmare. Using adjustable levelling pads can save you a world of time and frustration.
For a deep dive into getting this crucial first step right, check out our detailed article on shipping container levelling. It’s essential reading before you start any structural work.
Fitting Insulation Between the Battens
With the framework in place, you’ve created the perfect opportunity to give the container’s thermal performance a massive boost. The spaces between your vertical battens are ideal for slotting in rigid insulation boards.
Measure the gaps between your battens carefully and cut the insulation boards for a snug fit. You’re aiming for as few gaps as possible to avoid 'thermal bridging'—that's where heat finds an easy path to escape through unprotected spots. The insulation should be pushed right up against the primed surface of the container.
Some common choices for insulation here are:
- PIR (Polyisocyanurate) Boards: These give you excellent thermal performance without being overly thick, making them a really popular choice.
- Extruded Polystyrene (XPS): Known for being strong and highly resistant to moisture.
- Mineral Wool: It works well, but you have to be extra careful to protect it from any potential moisture getting in.
Once the insulation is fitted, it’s a good idea to cover it with a breathable membrane. This works like a one-way valve: it lets water vapour escape from inside the wall but stops any moisture that might get behind the cladding from soaking your insulation. This membrane gets stapled to the outer face of the timber battens, creating the final surface before the cladding goes on.
Attaching and Finishing Your Cladding Panels
This is it—the final and most satisfying stage. With all the prep, framework, and insulation sorted, you can finally start attaching your chosen cladding material. The exact method will vary depending on what you’ve chosen.
Timber boards, for instance, are usually fixed with stainless steel screws to stop rust from staining the wood. Composite panels often use a clever system of concealed clips for a clean, fastener-free look. Metal cladding might need specialised fixings or even rivets. Whatever you're using, always follow the manufacturer's installation guide to the letter for the best results.
Work methodically from one end of the container to the other, making sure each board or panel is level and correctly spaced. Pay close attention to the details around windows, doors, and corners. These are the spots where water is most likely to try and find a way in, so precise cutting and sealing are paramount.
Finally, install all the necessary corner trims, flashing, and seals to make the whole system completely weatherproof. These finishing touches are what separate a decent DIY job from a professional installation. A properly sealed and trimmed project won’t just look better; it will stand up as a robust, durable shield against the British weather for many years to come.
Navigating UK Building Regulations and Safety On-Site
Cladding a shipping container is about more than just a facelift, especially if you plan on turning it into a workspace, garden room, or any kind of habitable space. Before you get your hands dirty with the installation, you absolutely have to get your head around the UK's legal framework. This covers both the formal building regulations for your project and the practical safety measures you need on-site.
Getting this right from the start saves you from costly rework, keeps your structure safe, and ensures you're not falling foul of the law. Let's be clear: ignoring these rules can lead to some serious headaches, including being ordered to take the whole thing down.
Understanding Your Legal Obligations
There are two key hurdles you’ll need to clear: Planning Permission and Building Regulations. It's easy to get them mixed up, but they are completely separate things. Planning Permission is all about the principle of the development—whether you’re allowed to build something in a particular spot and how it looks.
Building Regulations, on the other hand, dive into the technical nitty-gritty of construction. They're there to make sure the building is structurally sound, safe for people to use, and energy-efficient. Even if your project is small enough to not need planning permission, it will almost certainly have to comply with Building Regulations if it’s intended for human occupation. If you're tackling a new structure or making big changes like adding cladding, this a homeowner's guide to single-storey extension building regulations is a great resource for understanding the approvals you'll need.
Core UK Building Regulations for Container Cladding
When you're cladding a shipping container, two parts of the UK Building Regulations are particularly critical. Your choice of materials and how you install them will be make-or-break for compliance.
-
Part B (Fire Safety): This one is non-negotiable. It covers the fire performance of building materials. Your entire external wall system—that’s the cladding, the insulation, and the frame holding it all together—must provide adequate resistance to the spread of fire.
-
Part L (Conservation of Fuel and Power): This part is all about energy efficiency. To comply, your project has to meet minimum standards for thermal insulation to prevent heat loss. This is exactly why the type of insulation you choose to sit behind your cladding is so important.
Since the Grenfell tragedy, fire safety has driven billions of pounds worth of modifications across the UK construction industry, and cladding is right at the centre of it. In fact, government reports from May 2023 identified over 5,000 high-rise residential buildings with unsafe cladding. For container projects, this means using non-combustible materials like fibre cement or metal panels is essential to meet Part B (fire safety) and Part L (energy efficiency), drastically reducing fire risks.
Always have a chat with your local council’s building control department before you start buying materials. They are the ultimate authority for your specific area and project, and they'll ensure you’re on the right track from day one.
Prioritising On-Site Safety
Paperwork aside, keeping the work environment safe during installation is paramount. Let's face it, cladding a container means you'll likely be working at height, using power tools, and shifting heavy materials around.
Good planning is everything. Make sure you have a stable work platform, like proper scaffolding or a work tower, to get to the higher parts of the container. Never, ever over-reach from a ladder—it’s one of the most common ways serious accidents happen.
When you're cutting any materials, whether it’s timber, metal, or composite, you need the right Personal Protective Equipment (PPE). No excuses. This includes:
- Safety Goggles to keep dust and flying bits out of your eyes.
- A Dust Mask that’s rated for the material you’re cutting.
- Durable Gloves to save your hands from splinters and sharp edges.
- Hearing Protection if you’re using loud tools like grinders or circular saws.
A tidy site is a safe site. Keep your tools organised, watch out for cables that could trip someone up, and clear away waste as you go. For more in-depth tips, have a look at our article on health and safety for container projects. A few sensible precautions will make sure your project gets finished without any incidents.
Applying the Finishing Touches and Long-Term Care

With the main cladding panels fixed in place, it’s tempting to call it a day and admire your work. But hold on—the final 10% of the job is what really makes the difference, giving your project a professional, polished look and ensuring it lasts for years.
These finishing touches are all about creating a completely weatherproof seal and preparing the surface for the unpredictable British climate. It's less about heavy lifting and more about paying close attention to the small details that separate a decent DIY job from a truly exceptional one.
Perfecting Trims and Weatherproofing
Any cladding system's weakest points are always the corners, joints, and edges around openings like doors and windows. These are the spots where wind-driven rain will relentlessly try to find a way in. Meticulous sealing here isn't just a suggestion; it's non-negotiable.
Corner trims are crucial for creating a neat, crisp finish. They also protect the vulnerable end-grain of timber boards or the cut edges of composite panels. Always stick with the manufacturer-recommended trims for your cladding material to guarantee a perfect fit and colour match.
Once your trims are on, the next job is to apply a high-quality, external-grade sealant to every single gap. That includes:
- The joints where trims meet the cladding panels.
- The entire perimeter around your window and door frames.
- Anywhere a service pipe or vent punches through the cladding.
Don't be tempted to use cheap interior silicone you've got lying around. It just won’t stand up to UV exposure and constant temperature changes. Invest in a proper exterior frame sealant for a flexible, durable, and waterproof barrier that will last.
Applying Protective Finishes
For materials like untreated timber or fibre cement, a protective finish is the final layer of defence. This isn't just about adding a splash of colour; it’s a critical barrier against moisture and UV degradation that can break down your materials over time.
With timber cladding, you’ve got a few options. A penetrating oil or stain will bring out the natural grain while providing excellent water repellency. On the other hand, an opaque paint offers the highest level of UV protection. Whichever route you take, follow the manufacturer's instructions to the letter, paying close attention to the recommended application temperatures and the number of coats needed.
Remember, the key to a long-lasting finish is all in the preparation. The surface needs to be completely clean and dry before you even think about applying paint, stain, or oil. Rushing this step will only lead to peeling and a finish that fails prematurely.
Establishing a Long-Term Maintenance Routine
Your clad container is now ready to face the elements, but a little ongoing care will keep it looking its best for decades to come. The maintenance schedule will depend entirely on the material you chose.
Here’s a simple annual checklist to get you started:
- Visual Inspection: Do a quick walk-around. Look for any cracked sealant, loose fixings, or panels that look out of place. Pay extra attention to the corners and joints.
- Gentle Cleaning: At least once a year, give the cladding a good wash with a soft brush and a mild detergent solution to get rid of dirt, algae, and grime. A pressure washer can be too harsh for some materials, so always start gently.
- Check Ventilation Gaps: Make sure the ventilation gaps at the top and bottom of your rain-screen are clear of leaves, cobwebs, and other debris. Good airflow is key.
- Re-treatment Schedule: Put a reminder in your calendar for re-treatment. Treated softwood might need a fresh coat of stain every 3-5 years, while a premium hardwood could go 5-7 years between oiling. Composite and metal cladding? They just need a good clean.
By following this straightforward routine, you’re protecting your investment and ensuring your cladding remains a durable, attractive, and effective shield for your shipping container.
Got Questions About Cladding a Shipping Container?
Even with the best plan in hand, cladding a container for the first time is bound to bring up a few questions. From regulations and costs to practical challenges, it's completely normal to have concerns. We get these queries all the time, so here are some straight-talking answers to the most common questions we hear from project planners in the UK.
Do I Need Planning Permission to Clad a Shipping Container in the UK?
This is the big one, and the classic answer is: it depends. If your container is just being used for temporary storage and isn't a massive eyesore for the neighbours, you often won't need planning permission. But the moment its use leans towards being permanent, the rulebook changes.
You will almost certainly need to get planning permission if the container is going to be a permanent fixture—think home office, garden room, or workshop. The thing is, cladding makes a container look much more like a permanent building, which is exactly the sort of thing that gets the attention of your local planning authority.
The smartest thing you can do? Assume you might need permission and just have a quick, informal chat with your local council's planning department before you even buy the first piece of timber. A five-minute phone call can save you from a world of headaches, potential enforcement notices, and costly rework.
What Is the Best Way to Attach a Timber Frame to the Steel Container?
The main goal here is to avoid drilling holes through the container's steel skin. Every single hole you drill is a future rust spot just waiting to happen. Thankfully, there are brilliant non-invasive methods that let you attach a frame without compromising the container's integrity.
Your best bets include:
- High-Strength Construction Adhesives: Don't underestimate modern bonding agents. The right adhesive can create an incredibly powerful connection between timber battens and the container's steel surface, no drilling required.
- Specialised Clamping Systems: These clever bits of kit are designed to grip the container's super-strong corner castings or edges, giving you secure anchor points for a frame.
- Welding Brackets: If you're after the most secure and permanent fixing possible, welding mounting brackets directly onto the container is a fantastic option. Just be aware that this is a job for a professional.
By steering clear of drilling, you keep the protective layer of the Corten steel intact and drastically cut down the risk of corrosion issues down the line.
How Can I Prevent Condensation Behind the Cladding?
Beating condensation is all about building a 'breathable' wall. You need to get smart with moisture management and airflow by creating a proper rain-screen system. It sounds complicated, but it boils down to two critical elements.
- A Vapour Barrier: This membrane goes up against the container's steel wall (on the warm side of the insulation). Its job is to stop any warm, moist air from inside your container from ever reaching the cold steel surface, which is where condensation forms.
- A Ventilated Air Gap: This is non-negotiable. You must leave a gap of at least 25-50mm between the outer face of your insulation and the back of your cladding. By installing vents at the bottom and top of the wall, you allow air to circulate freely, carrying away any moisture that gets trapped.
Get this combination right, and your container's internal structure will stay dry, preventing mould, damp, and the dreaded rust.
Can I Clad a Rusted Shipping Container?
Yes, you absolutely can—but you have to deal with the rust properly first. Just slapping cladding over active corrosion is a recipe for disaster. It traps moisture against the steel and lets the rust continue its destructive work, completely hidden from view.
Before you even think about building your frame, you need to get the surface prep right:
- Get a wire brush or an angle grinder and remove every last bit of loose rust and flaking paint.
- Treat the bare metal with a quality rust converter or inhibitor. This will chemically stop the rust in its tracks.
- Finally, seal the treated areas with a durable, zinc-rich metal primer to give it long-lasting protection.
Only once the surface is fully stabilised and protected should you move on to installing your cladding framework.
At Quickfit Container Accessories, we stock all the essential gear you need to get your container project done right the first time. From high-quality ventilation units to secure fixings and levelling pads, we've got you covered. Explore our full range of solutions at https://www.quickfitcontaineraccessories.co.uk to ensure your cladding project is built to last.